Vadim Kolesnik
myDevices company has recently announced a platform to create Internet of Things (IoT) projects based on the Raspberry Pi (RPi) single-board computer.
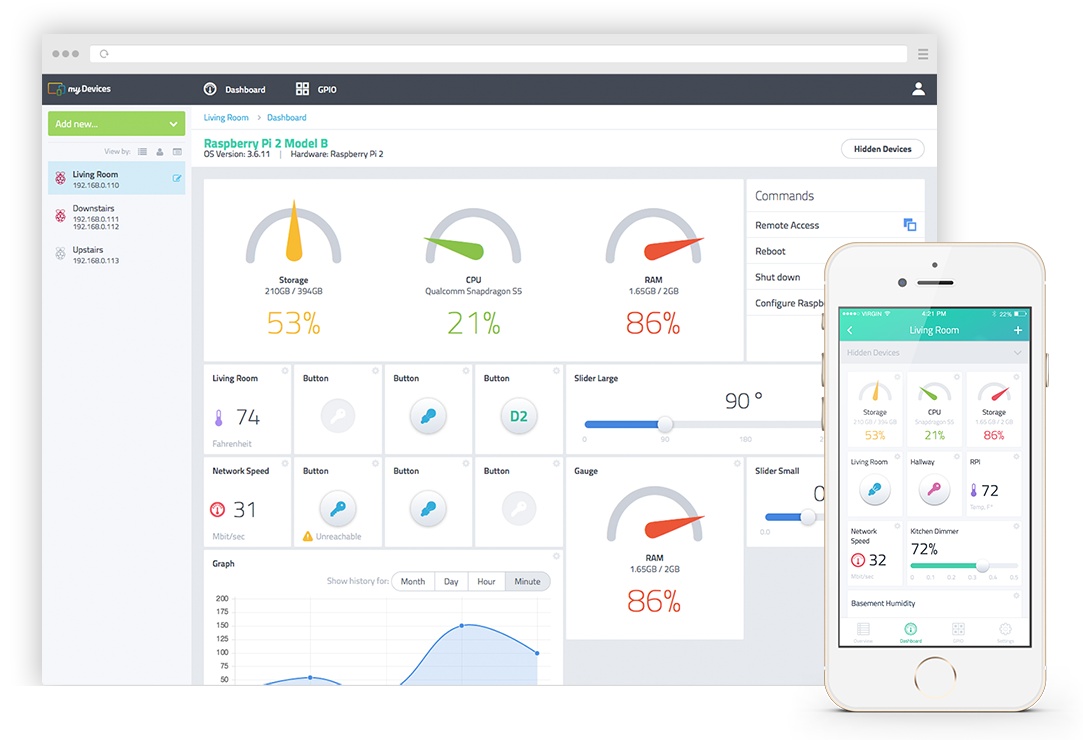
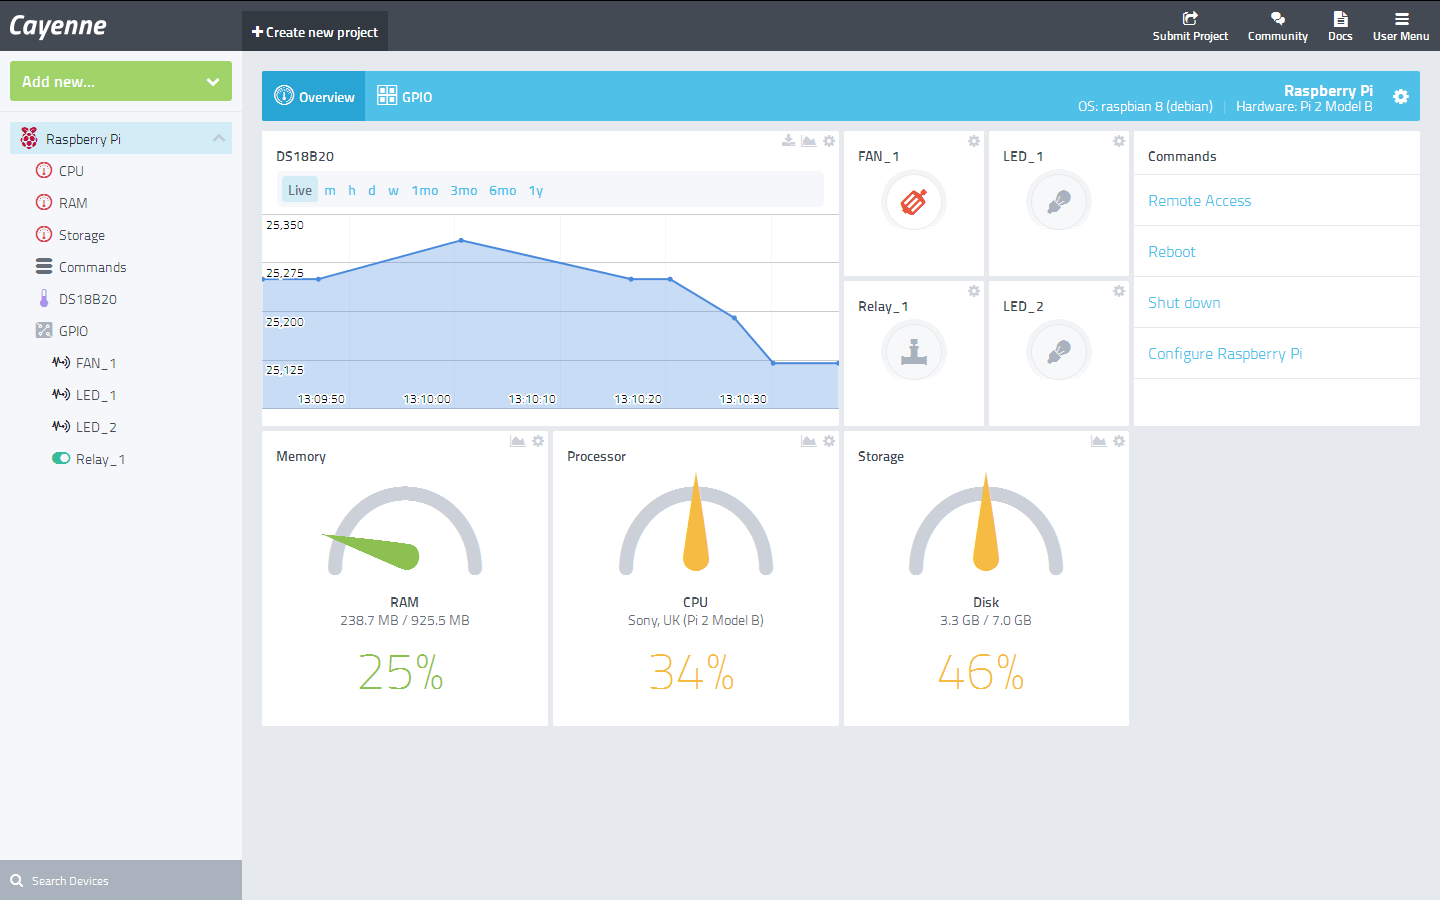
This project builder called Cayenne and first presented at the IoT Evolution Expo conference is designed not only for amateurs, but for professionals too (Figure 1). One is able to create an unlimited number of projects after free registration of account in the Cayenne cloud service. Full developer tools for IoT applications are available to receive the information from the sensors, remote control motors, actuators, including GPIO boards. There is an unlimited storage for data from sensors, configurable triggers and alerts. One can simply and easily create dashboards with drag and drop custom widgets.
 |
|
| Figure 1. | Cayenne - Simplifying the Creation of IoT devices on Raspberry Pi. |
Developers have positioned Cayenne as the first drag-and-drop application and cloud service for simplified development IoT projects on RPi. What if setting up a Raspberry Pi for IoT projects can be achieved in a matter of minutes. I decided to check in practice Cayenne capabilities and to share my experiences in this review.
Looking ahead the graphical user interface, which looks like a dashboard, is well designed and has an intuitive view. User with minimal effort can configure graphical widgets of connected peripheral devices.
So, to test the performance and capabilities of Cayenne cloud service I use:
- Raspberry Pi 2 Model B;
- microSD memory card 16 GB (8 GB is enough) Class 6 or Class 10;
- DS18B20 digital temperature sensor;
- 12 V DC fan from the old personal computer system unit;
- MOSFET (2SK3918) for controlling the fan;
- several LEDs and resistors;
- Smartphone with Android OS;
- power supply 5 V / 2 A;
- power supply 12 V / 1 A.
Installing Cayenne
After Cayenne account registration the user is prompted step-by-step instructions for system installing and configuring that allows opening access to free documents and projects for connecting peripherals to RPi board.
In the first stage, Raspbian Jessie OS image must be installed on the memory card (Jessie Lite has not supported at the time of writing this article) and run the system on our RPi board. Pay attention that the installation of the operating system is allowed only on the microSD memory card, you cannot use any boot (Berryboot, Noobs). Do not forget to sign in login/password after OS starting (whether in the terminal mode or GUI). For the convenience the further work and configuring support of SSH connections must enable, as well as file system should be expanded to the card's entire available memory. For this you need to run the utility to configure RPi with the command:
sudo raspi-config
In addition, it is possible to configure location, time zone, keyboard.
Once SSH activated one can realize RPi remote management from a PC on the LAN using a terminal program such as Putty.
Next, let us proceed to install Cayenne system that runs fully automatically with an interactive user notification of the status. Installation can be done in two ways: in the OS Raspbian terminal or through Cayenne mobile app. The option to install from mobile application is the most simple. In this case, the user only needs to create an account or sign in to an existing account, and then the application will determine automatically Raspberry Pi board connected to the LAN and install all the required software modules on it.
To install Caynee in terminal mode, you must execute at the Raspbian command prompt two commands that you will see in the online step-by-step installation instructions.
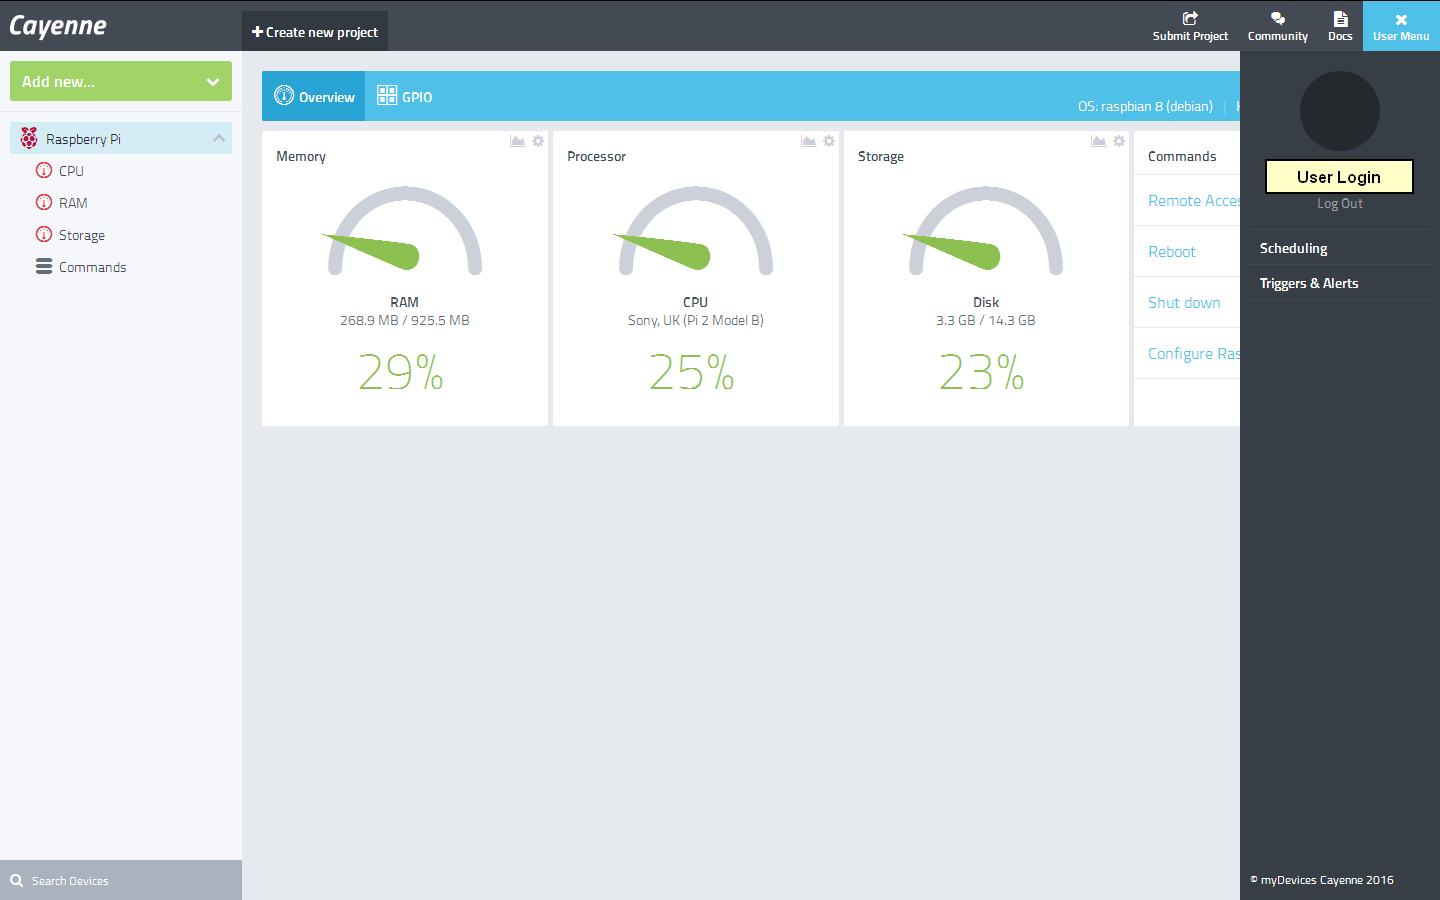
Installation of the required software modules and Cayenne agent takes about 10 minutes. At the end of the installation, you will be notified by e-mail, operating system restarts and WEB-interface or an application on your phone will automatically connect to the Raspberry Pi. Then you will see your dashboard and you can start to add sensors, actuators and triggers (Figure 2).
 |
|
| a) | |
 |
|
| b) | |
| Figure 2. | View Cayenne dashboard on the first run: a) Web-based interface, b) mobile application. |
User interface
Further, in the article I will use the system's web interface. The user interface of the mobile application is identical, differing only in some elements of design and management methods. Having dealt with the web interface, you can easily find out the mobile app too.
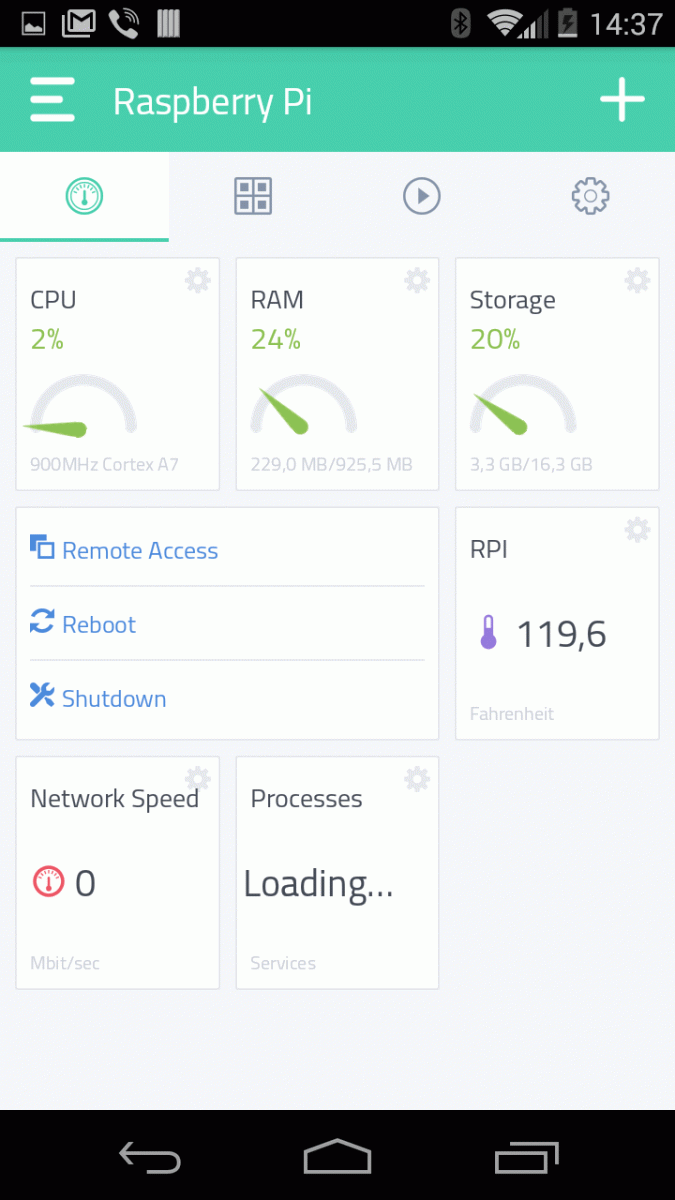
At the first system’s start, you will see on the desktop default 3 widgets reporting CPU usage and memory status. More default widgets informing about CPU temperature, system processes and network connection speed added to the mobile application. The control panel for adding sensors and actuators, as well as additional RPi boards, located on the left side. I was not mistaken, the user in a single project can merge several single-board computers that perform different tasks and write triggers to automate any processes in the system.
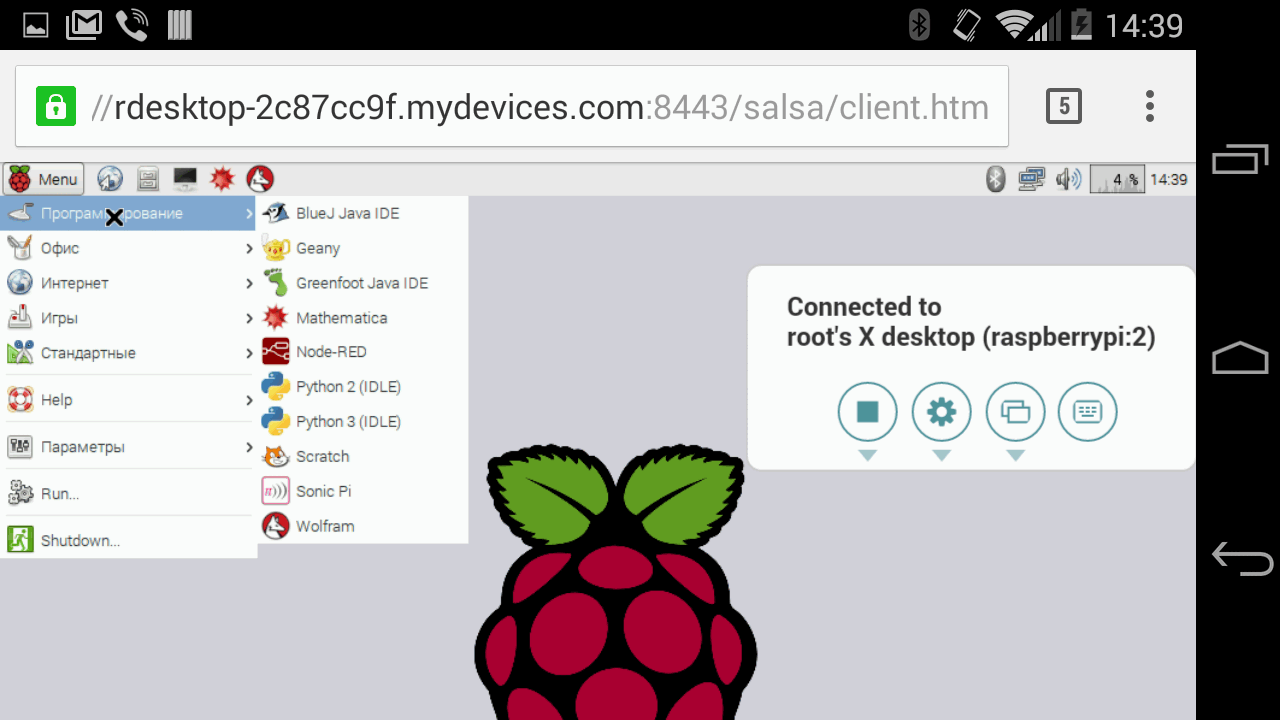
Menu with account information, remote RPi board settings and management tools is on the right side. Commands on RPi board restart and shutdown, webcam and communication interfaces (I2C, SPI, UART, 1-Wire,) turn on/off (if connected) and remote Raspbian desktop connect (in web browser) are available. By connecting to the remote desktop user gets full access to the RPi operating system (Figure 3).
 |
|
| a) | |
 |
|
| b) | |
| Figure 3. | Cayenne provides remote access to the Raspbian desktop: a) Web-based interface, b) Android-smartphone browser. |
On the dashboard (this definition is more appropriate for the respective graphic design) users can add sensor, I/O ports and actuators widgets. The ability to configure the widgets on the dashboard allows you to create different projects of graphic interfaces (Figure 4).
 |
|
| Figure 4. | User can configure the widgets style and change their location on the dashboard. |
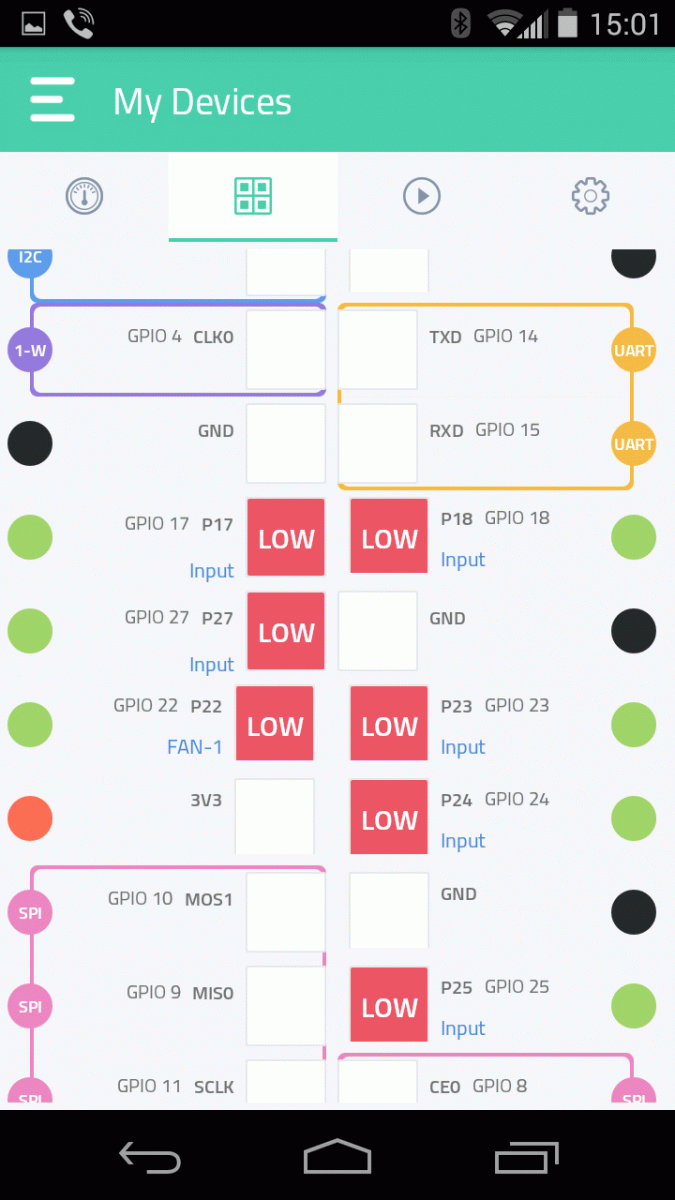
The dashboard has another very useful bookmark – Raspberry Pi GPIO connector interactive map (Figure 5). The user sees the I/O lines purpose, the current configuration and the logical state, and can configure the available ports (input/output) and change the logic state. If the user employ any available port for their own purposes (add a widget on dashboard), then on the GPIO map will be displayed name of the widget on the corresponding pin. It is useful for expanding functionality and adding new devices.
 |
|
| a) | |
 |
|
| b) | |
| Figure 5. | Interactive GPIO map of the Raspberry Pi Expansion connector: a) Web-based interface, b) mobile application. |
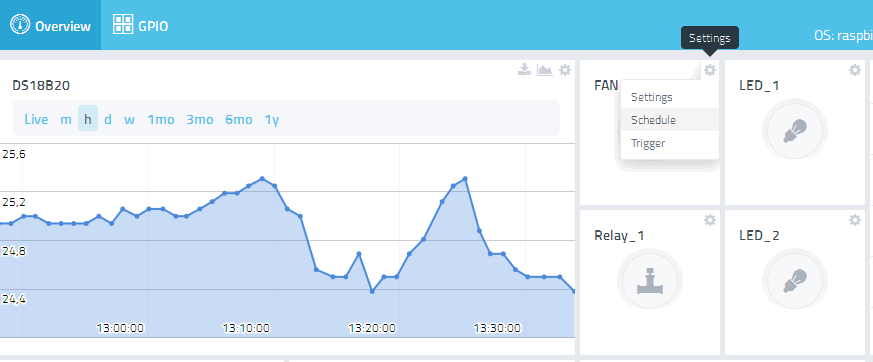
Triggers editor for and scheduler (Scheduling) are available in the user’s menu or directly in the widget properties (Figure 6).
 |
|
| Figure 6. | Triggers Editor and Scheduling are available in the widget settings. |
Additional devices connecting
Additional devices are the outer periphery that user connects to RPi board (various sensors, actuators, buttons, relays, etc.). The Cayenne supports digital and analog sensors, but the last ones are connected via an external ADC to the RPi SPI/I2C interface. Actuators and mechanisms, such as lighting dimmers and servos are also connected with additional drivers or expansion cards (Figure 7).
 |
|
| Figure 7. | Ability to work Cayenne with analog sensors provided by support for external ADC. |
At the moment Cayenne system supports the following peripherals:
- temperature sensors:
- TMP36, TMP102, DS18B20, BMP180, thermistors;
- light sensors:
- VCNL4000, TSL2561, photoresists;
- pressure sensors:
- BMP180, analog pressure sensors;
- analog proximity sensors;
- digital motion sensors
- actuators
- light switches and dimmers;
- motors and actuators;
- relays, electric valves;
- PWM outputs;
- additional tools for working with analog signals and expansion I/O ports:
- analog converters:
- MCP3004, MCP3204, MCP3208, MCP3008, ADS1115, ADS1015;
- I/O ports expansion:
- MCP23018, MCP23S18, MCP23017, MCP23S17, MCP23009, MCP23S09, MCP23008, MCP23S08, DS2408, PiFace Digital expansion card;
- PCA9685 - 16 PWM outputs (12 bit).
- analog converters:
Documentation for connecting of this peripherals is available for users. All connections of external devices to RPi must be performed with the power off.
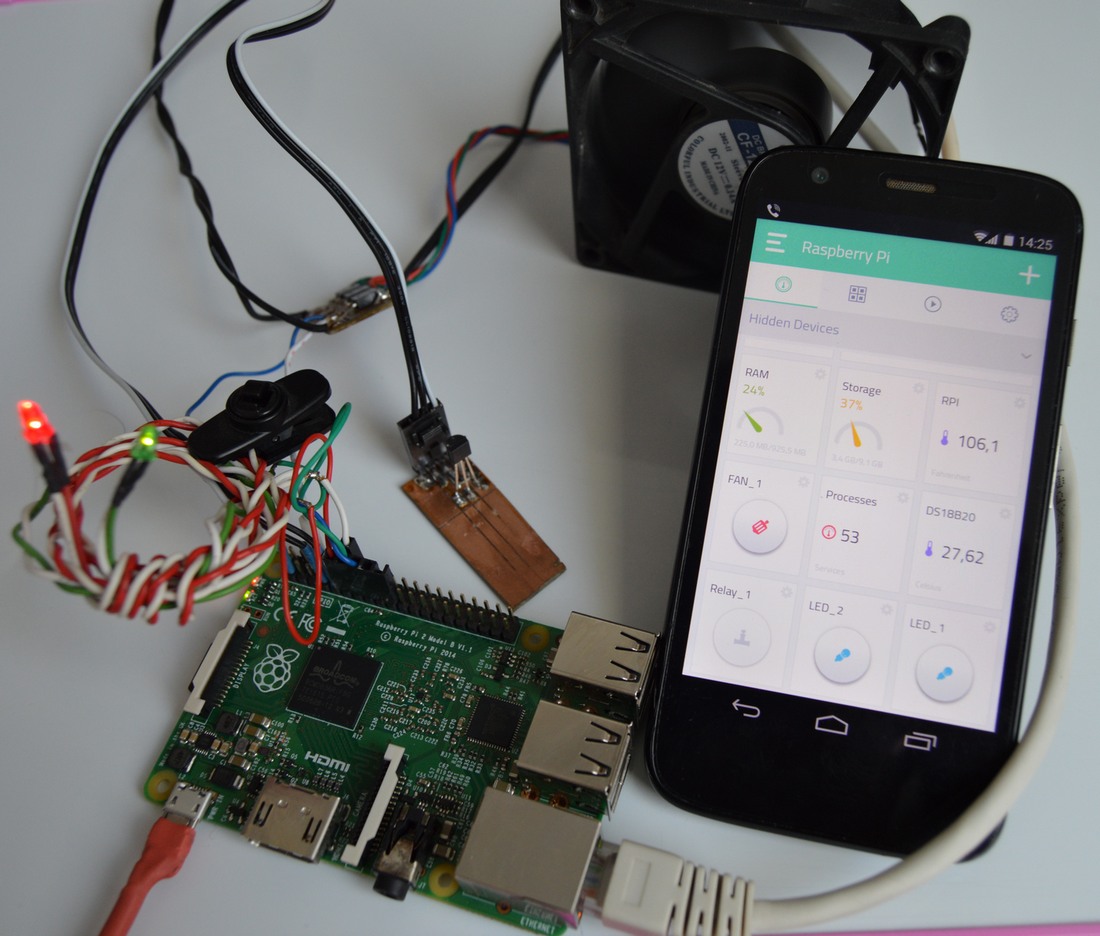
As I stated earlier in this article, digital temperature sensor, fan and several LEDs were used. Connection to RPi is shown in Figure 8.
 |
|
| Figure 8. | Connecting DS18B20 sensor, LEDs and fan to the RPi board. |
Connecting to the RPi terminal expansion is not caused difficulties due to I/O ports map (Figure 9). Let me remind, that I did not set the task of developing some automation system, but I only want to make sure that the Cayenne is working well and check whether IoT device is so easy to create in this system.
 |
|
| Figure 9. | Connecting peripherals to the RPi expansion connector made very easily and quickly. |
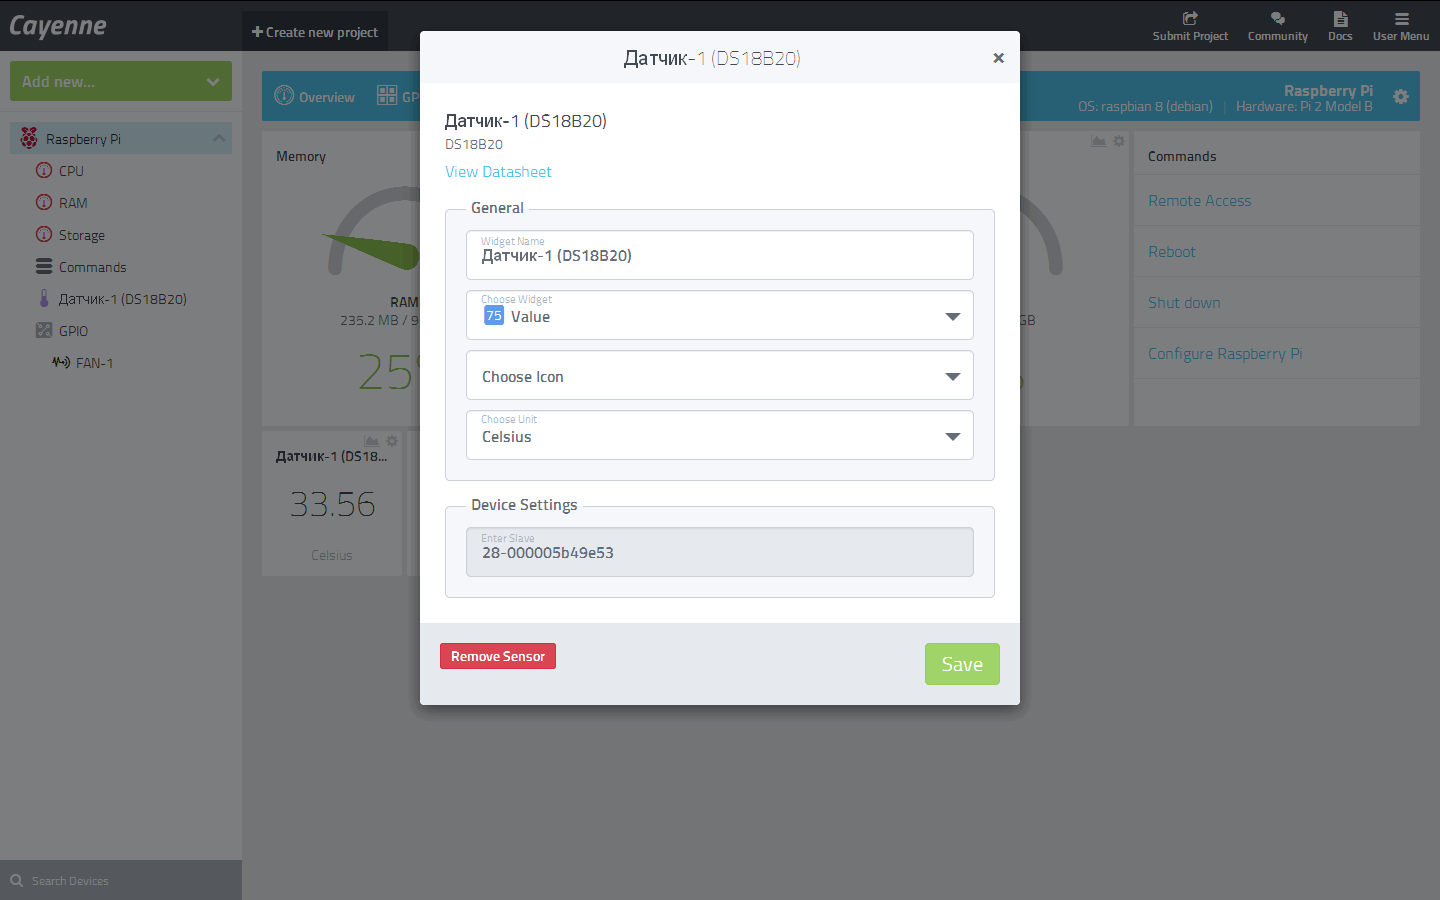
We can run RPi after connecting external peripherals and verification of mounting. Starting the operating system and connection to Cayenne cloud service will take about 4-5 minutes. After that, as in the web interface or mobile app are connected to the remote device, we can start to add devices and control widgets. In my case, DS18B20 temperature sensor was automatically detected and successfully appeared on the dashboard after connecting Rpi to Cayenne temperature widget. It was only need to configure it (Figure 10). All data from the temperature sensor are collected by system for the further displaying in statistical charts. In addition, the user can download the data in CSV format for processing in other programs.
 |
|
| Figure 10. | Configuring the DS18B20 temperature sensor widget. |
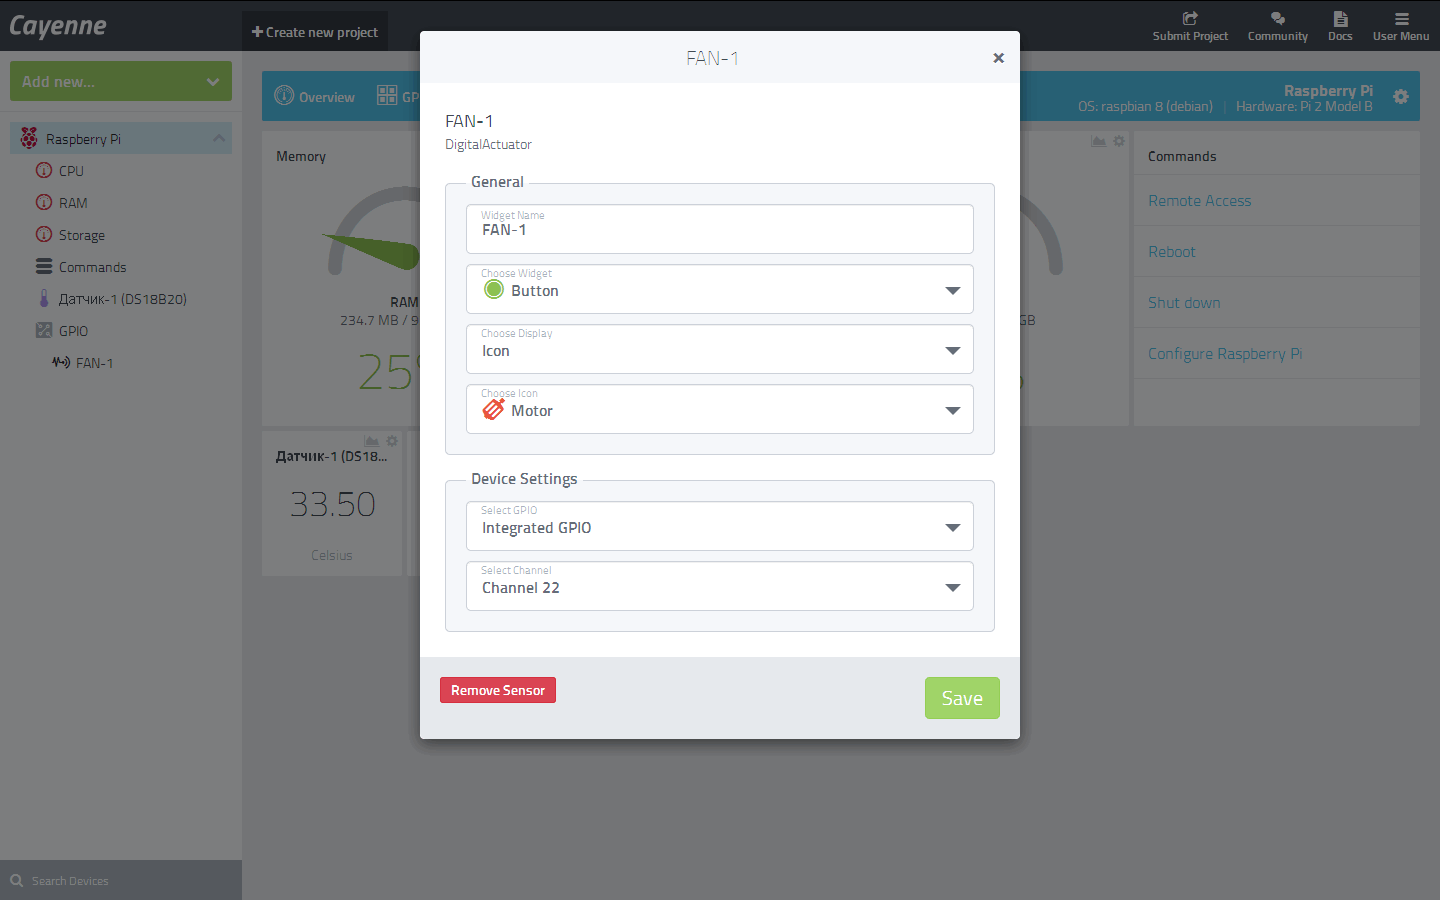
Fan (FAN_1) connected to GPIO22 pin, so we add a widget Digital Output (Digital Actuator). Specify the name, icon, I/O channel and the port (Integrated GPIO). In this case, the last parameter indicates to the system that we are using an I/O port on the RPi board. In the case of connecting of the expansion card (or external I/O expander chip) we can specify I/O channel owned by the expansion card. In the same way you can connect and configure the widgets for LEDs and other peripherals (Figure 11).
 |
|
| Figure 11. | Installation and configuring widget for Digital Actuator. |
All the available I/O channels are displayed on the GPIO map. The configuration of ports (input/output) is automatically changed depending on the connection type.
Checking the operation: data is received from the temperature sensor and statistics are collected (you can see the temperature changes on the periods), with widgets on the dashboard FAN_1, LED_1, LED_2 we can control the fan and LEDs. Please note, that in this case the logical state of the output is changed on the GPIO map.
Creating triggers and scheduling
Now we can start to build triggers on the example of ambient temperature monitoring. Creating an event handler is executed in the If-Then style structure (Figure 12) and requires minimum user actions:
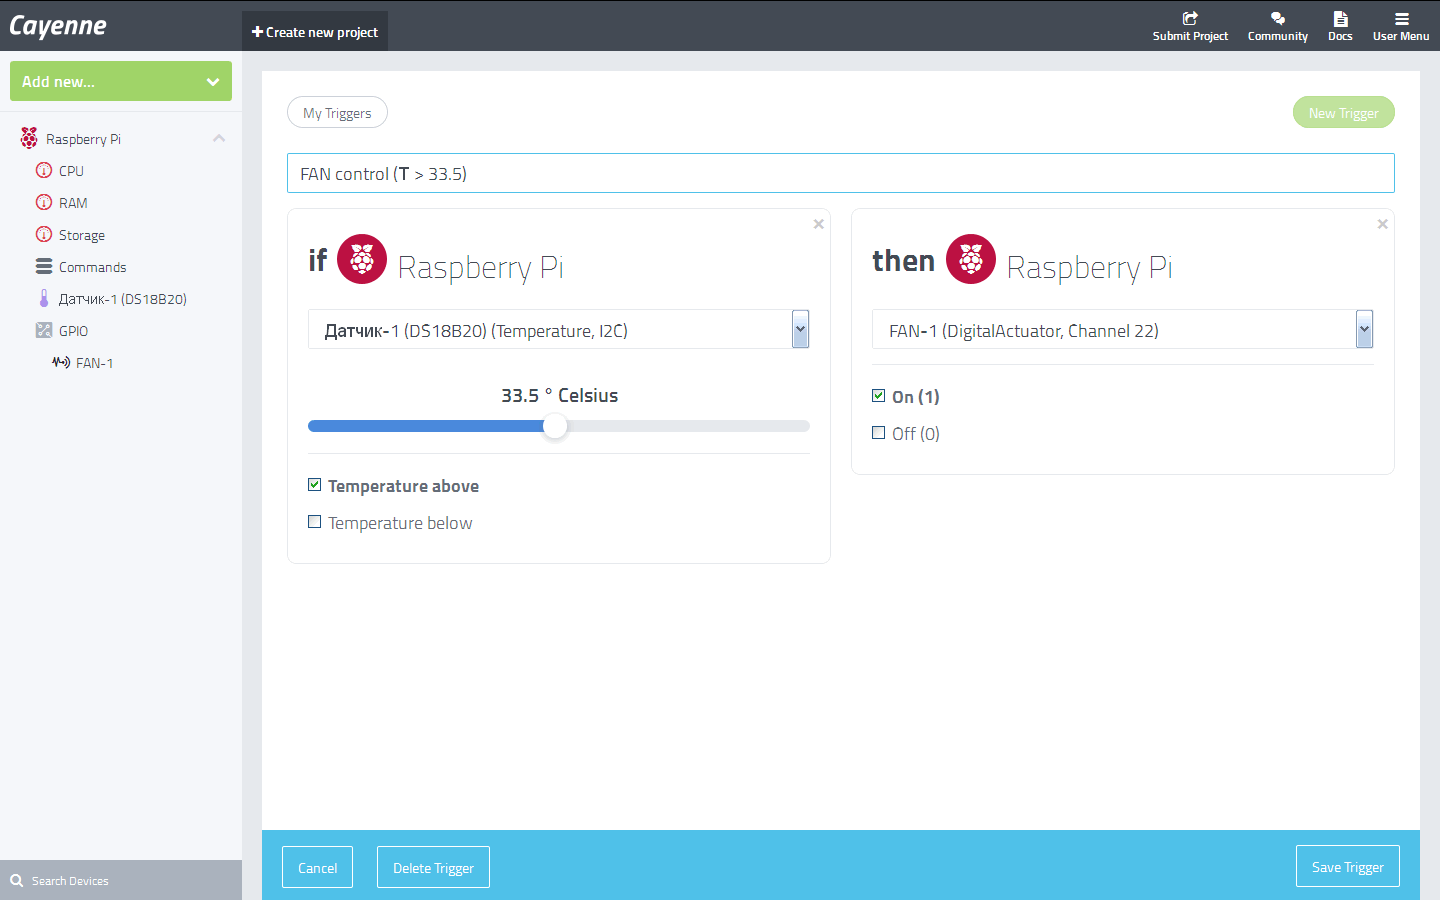 |
|
| Figure 12. | Triggers Editor for creating automation algorithms, setting the fan switch-on conditions. |
- drag the required RPi device (remember, we can control several RPi boards), to which appropriate sensor is connected from control panel in the If operator field;
- in If operator we choose temperature sensor and set the desired switching threshold (for example, the temperature is above 25 °C);
- in Then operator's field drag from control panel required RPi device that is connected to the actuator (FAN_1);
- select the I/O channel and set the active state (On (1) / Off (0))
- assign a trigger name and save.
From that moment, the fan will turn on if the condition that the ambient temperature is above 25ºC. Next, in the same way you can add conditions to the fan off. The more sensors that monitor the state of the environment, the more flexible triggers can be created and controlled. Additionally, here you can create a text user notifications about running triggers.
Do not forget that GPIO ports can be used as digital inputs (automatically configured), and can also use them in triggers algorithms and automation.
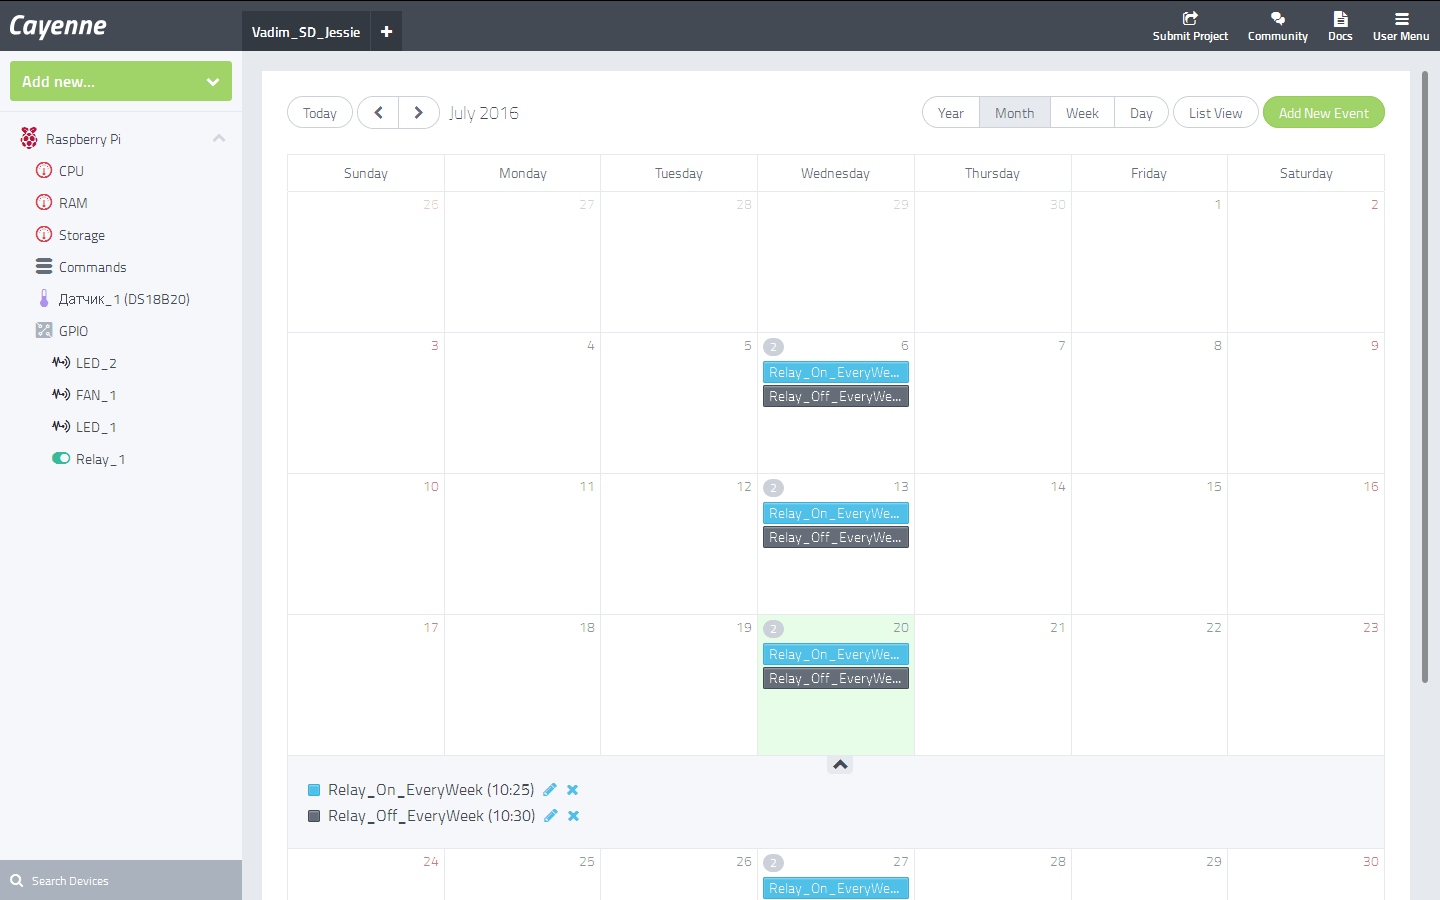
The same approach is used in the Scheduler. The user can configure the automatic control of external devices on a schedule and adjust the frequency of the actions (Figure 13).
 |
|
| Figure 13. | Built-in scheduler allows for control of external devices on a schedule. |
Conclusion
Until recently, I have not seen similar services for easy development IoT projects in any single-board computers or microcontrollers. Features and benefits of Cayenne ease of installation, configuration and connection of sensors, actuators and other peripherals undoubtedly pleased. It took me a few hours to create "from scratch" the most primitive system of remote temperature monitoring and automatic fan control with a graphical user interface. At the same time I did not have to resort to the study of any documentation to work in the Linux-systems, setting any data interfaces, and so on. It is very accessible, understandable and explained in detail in Cayenne itself. Although many people will disagree with me, because the development of such systems completely eliminates the need to have at least some microcontrollers and embedded applications programming skills, but such services have the right to exist. Someone will say that connecting peripherals (sensors, actuators, ADC) to the Raspberry Pi and work with it - it is absolutely not difficult. Perhaps, but assemble it into a complex system with a graphical user interface and remote access is the tall order for everyone. Also, many people need such services. I discovered this after reading the forums and user messages in the Cayenne community.
Of course, Cayenne (note that it is a new project) has some drawbacks. Users and developers reveal bugs and troubles in the operation of the system; it is inherent in any project. But Cayenne developers quickly eliminate them, add new functions and features, take into account users opinion, gradually expand the list of supported devices and sensors. So I can state that the Cayenne project is worthy of attention not only to beginners and amateurs but for professionals too.
