This Design describes a simple yet powerful handheld probe that you can use as both a logic probe and a pulse generator either individually or simultaneously. This feature makes the probe useful for testing DIP digital ICs, such as gates, flip-flops, and counters, using a socketed fixture with three-post jumpers to connect each pin to logic high or logic low or to 5V or ground. Three pushbutton switches, two dual-color LEDs, and two probe tips are built into a plastic cylinder, such as an empty 20g-or-larger glue-stick tube. The generator’s probe tip hooks to fit onto the test fixture’s jumper pins and mounts onto a spring, such as those in retractable ball-point pens, for flexibility, and it allows the logic-probe tip to move to the output under test. Two of the pushbutton switches set the generator’s quiescent state for a high output or a low output. The third switch briefly single-pulses the output to the opposite state. If the switch is pressed for longer than 2 seconds, the output produces a pulse train.
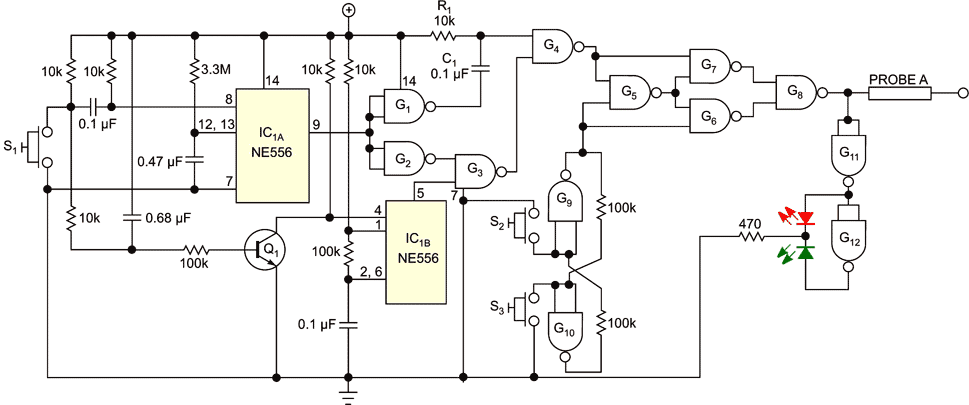
IC1A, an NE556, is a 2-sec monostable circuit, which triggers a 1-msec-pulse-generator circuit employing gate G1, resistor R1, and capacitor C1 (Figure 1a). G4 buffers the circuit. The output of the monostable circuit also passes through G2 and G3 to mask the output of the astable component, IC1B, an NE556 that provides the pulse train. To prevent any spurious pulse from reaching output Probe A when switch S1 is not depressed, keep IC1B deactivated by applying a low voltage to its reset Pin 4 through transistor Q1, whose biasing a 0.68-μF capacitor further guards.
|
|
|
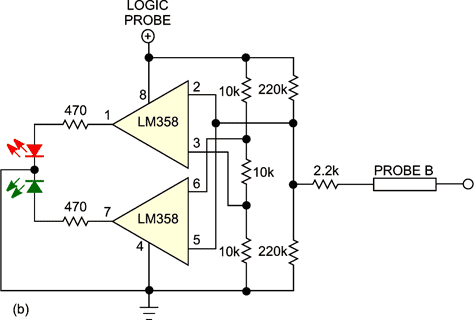
| Figure 1. | This circuit combines analog and digital functions. Probe A is the pulse-generator probe, and probe B is the logic probe (a). Although not shown, a 100-μF capacitor should be connected between the supply and ground. Red LEDs indicate logic zero, and green LEDs display logic one (b). |
When you press switch S1 for a short time, IC1A fires and produces a high output for approximately 2 sec. The 1-msec pulse from G1, R1, C1, and G4 reaches the pulse Probe A through the XOR function comprising G5 through G8, and the output of the astable IC1B is masked at G3 from reaching the XOR. If you depress switch S1 for longer than 2 sec, the monostable IC1A times out. This action unmasks G3 and allows the 70-Hz oscillation from IC1B to reach the XOR.
G9 and G10 form a bistable circuit, which “remembers” the most recently pressed S2 or S3 switch and controls the inverting and noninverting operation of the XOR function. G11 and G12 together drive the dual-color LED to indicate the pulse generator’s polarity. Red indicates that Probe A’s output is mainly logic zero, with the single 1-msec pulse a logic high. Green indicates the opposite.
The LM358 acts as a window-detector logic probe (Figure 1b). With the values in the figure, the red LED lights at Probe B voltages of less than 35% of the supply voltage, and the green LED lights at voltages greater than 65% of the supply voltage. Neither LED lights between these voltages. You may wish to adjust the resistor network to reduce the lower threshold to include the transistor-transistor-logic zero of less than 0.8V.
If you use CD4011 quad NAND gates, you can externally power the probe at 4.5 to 15V. Using a CD4093 Schmitt-trigger quad NAND for G1 through G4 ensures no spurious oscillations as a result of the slow voltage rise at timing capacitor C1. If your design requires a higher-current generator drive, you can add a pair of NPN and PNP boost transistors to the output.
|
|
|
| Figure 2. | Program this test jig with header posts and jumpers for the IC under test. |
Figure 2 shows a jig for testing the digital ICs. You configure the 16-pin DIP socket for the device under test with an array of triple-post headers and pushon jumpers. You can connect any pin directly or through a resistor to power or ground to configure power or logic levels. The resistors can be any suitable value; approximately 2 kΩ is appropriate. To set a TTL low, the pin must connect directly to ground. To inject a signal, hook the flexible spring-mounted generator, Probe A (Figure 3), onto the appropriate input post and then move logic Probe B to the corresponding output post or pin.
|
|
|
| Figure 3. | To inject a signal, hook the flexible spring-mounted generator, Probe A, onto the appropriate input post and then move logic Probe B to the corresponding output post or pin. Figure 2 Program this test jig with header posts and jumpers for the IC under test. |
Downloads
Perf-board layout - download


