Part 1 - Hardware
The getting started will guide you with installing the required software on the pc. There are only two programs required before you can program the Simplecortex: the IDE and the driver for Windows to recognize the Simplecortex as peripheral:
- CoIDE.
- Windows USB-driver.
The Simplecortex has more interesting hardware onboard though. It supports USB-host and Ethernet functionality too. To use these peripherals all the software below needs to be installed. The getting started is spliced up in five parts:
- Installation CoCenter.
- Installation CoIDE.
- Installation Windows USB drivers.
- Setup Ethernet.
- Installation virtual com-port drivers.
CoCenter is a program to keep all the software provided by Coocox up to date. If there is a newer software version avialable, the only thing you have to do is click on install. CoCenter will download a patch and install it automaticly.
CoIDE is an IDE (Intergraded Development Envirement). The CoIDE environment is the environment of choice for the Simplecortex. The debugger on the Simplecortex is designed for CoIDE. Because the communication between the debugger and CoIDE is closed source, it is only possible to program and debug the Simplecortex by using CoIDE.
Windows USB drivers are needed for Windows to communicate with the Simplecortex. After installing this driver Windows will recoqnise the Simplecortex as debug device.
Virtual com-port drivers. The Simplecortex has to USB ports onboard, one is for the debugger and the second is an USB host. USB-host supports a great number of applications. Nxp, the producer of the microcontroller on the Simplecortex made a USB library which you can use to turn the Simplecortex into a serial device. On later stage BRC-Electronics will port the new library to the Simplecortex to support more functions.
Setup Ethernet
The Simplecortex is able to host a website, though before the pc can access the webserver a few settings must be changed. There are several ways to connect a Simplecortex to the network. The first option is to connect the Simplecortex directly to the pc. The second option is to connect the Simplecortex to the router. In that case, only the firmware needs some changes.
ETHERNET SETUP OPTION 1
These settings need only to be adjusted when the Simplecortex is directly connected to the PC.
To test the internet function, Windows need some network adjustments.
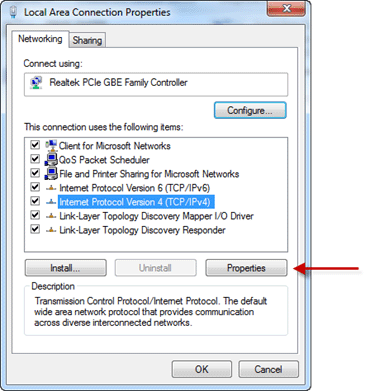
- Open: Start > Control Panel > Network and Internet > Change adapter settings.
- Right-click on the LAN network adapter.
- Please click on Properties (Figure 7).
 |
|
| Figure 7. | LAN network adapter properties. |
- Select Internet protocol version 4 (TCP/IPv4).
- Please click on Properties again.
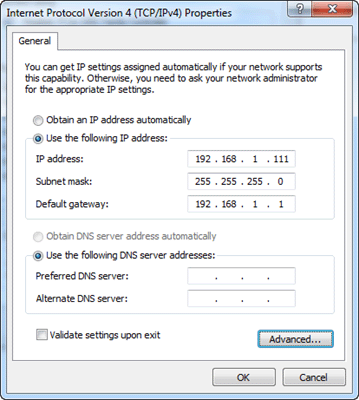
- Please select Use the following IP-address. Type the following parameters:
IP-address = 192.168.1.111
Network mask = 255.255.255.0
Standard gateway = 192.168.1.1
 |
|
| Figure 8. | TCP/IPv4 Properties for SimpleCortex Board. |
- Please click on OK to save the settings.
ETHERNET SETUP OPTION 2
When using this option there are only changes required in the main program of the Simplecortex. In this situation the Simplecortex is connected to a router. The advantage is that every computer and even smart-phone in the network can access the Simplecortex. It is even possible to access the Simplecortex from everywhere in the world through the World Wide Web.
Disclaimer: Because the Simplecortex is connected to the World Wide Web it can be accessed by people with bad intentions. The developers of the Simplecortex are not responsible for any damage.
Note that every time you create a new project, the ip-address must be modified.
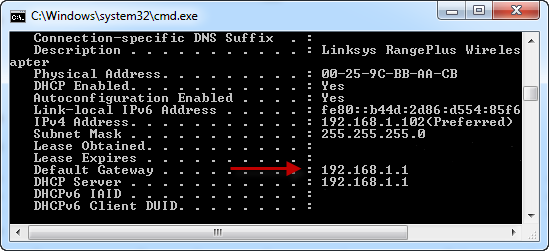
- In Windows; Please execute cmd and press Enter.
- Type ipconfig /all.
- Find the IP-address of your router (Default Gateway) and write it down somewhere.
 |
|
| Figure 9. | IP-address of your router (Default Gateway) |
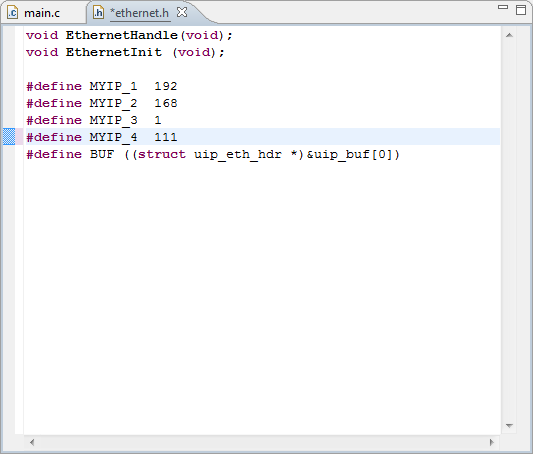
Please open the Ethernet library in CoIDE. Open the file Ethernet.h
In this area you can modify the IP-address of the Simplecortex. Keep the first three numbers the same and the fourth in a number that is easy to remind; for example: 192.168.1.111.
 |
|
| Figure 10. | Modifying the IP-address of the Simplecortex |
Warning, Never use an IP-address twice in one network. The first three number is the ID of the router, they needs to correspond with the default gateway of the router. You can variate the fourth number but be aware of IP conflicts between network devices.
Updating debugger firmware
The Simplecortex has an onboard debugger. Sometimes it is necessary to replace the firmware, for example: when a newer software version of CoIDE is installed. This page describes step by step how to update de debugger firmware. Note that the firmware version is associated with a specific version of CooCox. When you update CoIDE to a newer version, the debugger firmware and the USB driver needs an update too.
When you are using CoIDE version 1.3.x; It has been tested that the Simplecortex isn´t working properly with some kind of computer. Try the firmware 0.3 V2 to solve the problem.
|
CoIDE
|
USB Driver
|
Debugger firmware
|
|
1.3.х
|
1.1.х
|
0.3
|
|
1.4.х
|
1.2.х
|
0.4
|
Default, the Simplecortex will be delivered with de debugger firmware 0.4.
Follow the next steps to update the debugger firmware:
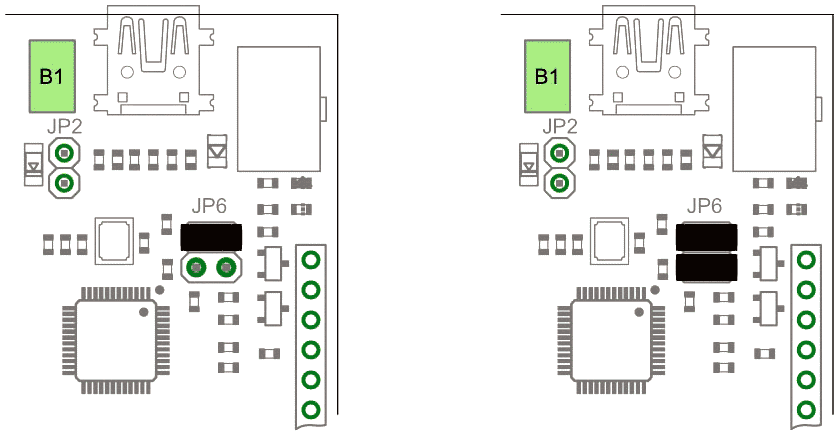
- Please place a jumper, just like the picture.
 |
|
| Figure 11. | Jumpers on Simplecortex Board for enable update the debugger firmware. |
- Please connect the USB-debugger with the PC. When you're doing this for the first time Windows needs to install some drivers, this may take some time.
- Place a second jumper on the other two pins until the next window appears.
- Please click on Open folder to view files.
- Replace the firmware with the newer version.
- Please disconnect the Simplecortex.
- Remove the jumpers.
- Connect the USB-debugger to the PC.
To check if the replacement went well, please open in Windows: Start > Control Panel > Device manager.
 |
|
| Figure 13. | SimpleCortex Debugger after updating firmware. |
Downloads
USB driver (64 bit Windows) - download
USB driver (32 bit Windows) - download
Debugger Firmware (0.3V1, 0.3V2, 0.4) – download
Archive with the latest libraries – download
