This self-heated constant-temperature-delta transistor anemometer is cheap, rugged, and sensitive. It relies on the relationship between airspeed (AF) and thermal impedance (ZT = °C/W) of a heated air flow sensor as shown in the formula below for a 2N4401 transistor in TO-92:
where:
ZJ = junction-to-case thermal impedance = 44 °C/W
SC = still-air case-to-ambient conductivity = 6.4 mW/°C
KT = “King’s Law” thermal diffusion constant = 0.75 mW/°C√fpm
AF = air flow in ft/min
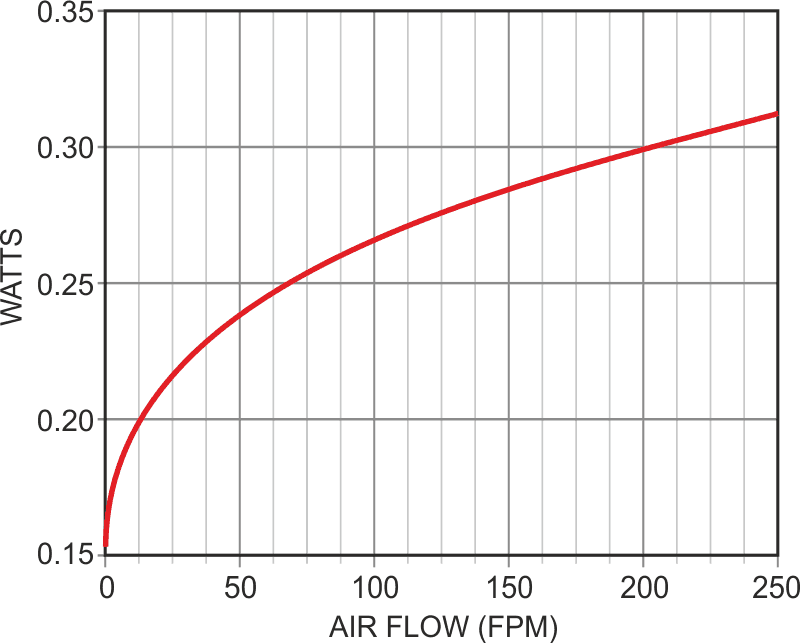
If the transistor junction is held at a constant temperature differential above ambient (e.g., ΔT = 31 °C), the power required to do so will be a function of air speed P = 31/ZT as shown in Figure 1. Note the annoying non-linearity.
 |
|
| Figure 1. | Power dissipated versus air flow of TO-92 held at a constant 31 °C above ambient (PW = 31/ZT). |
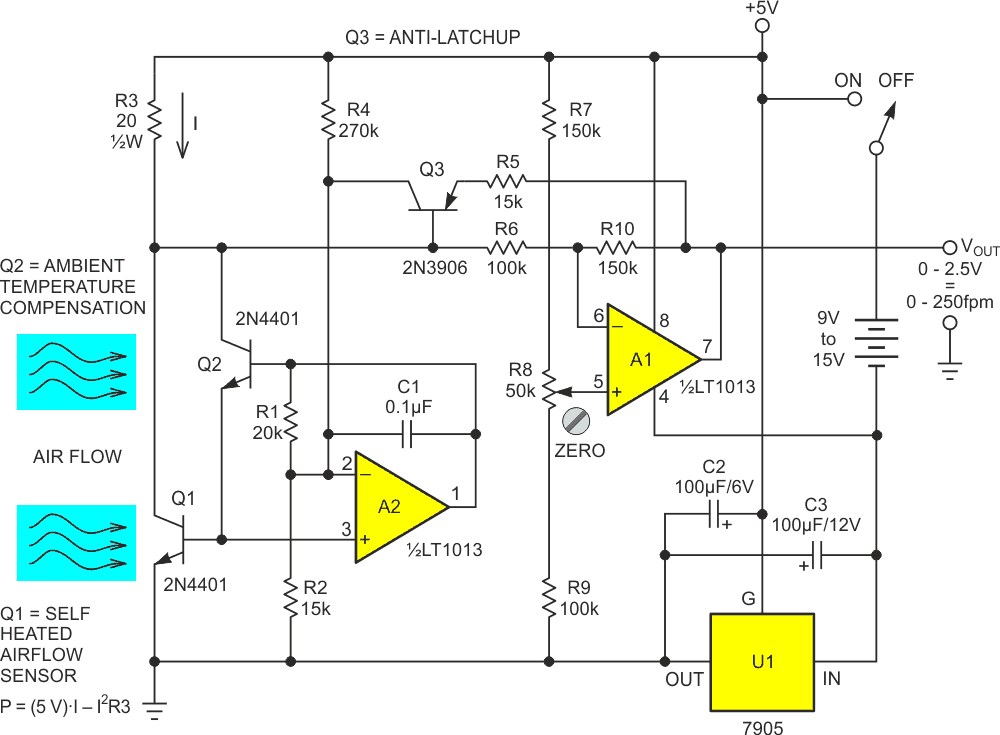
Figure 2 shows a practical portable thermostat circuit to achieve and maintain this ΔT utilizing a Darlington transistor pair (Q1 and Q2) to compensate for ambient temperature and convert the resulting nonlinear PW curve into a linearized anemometer air flow readout.
 |
|
| Figure 2. | Linearized portable Darlington anemometer schematic. |
Here’s how it works.
Q1 serves as the self-heated sensor modeled in the Figure 1 math, with Q2 providing ambient temperature compensation. Op-amp A2 runs a feedback loop that forces the Vbe differential between Q1 and Q2 (and thus the temperature differential between Q1 and ambient) to hold a constant 31 °C. It does this (with the help of Darlington current gain) by forcing Q1’s current draw (I) through R3 to drive Q1’s power dissipation (PW) to follow the Figure 1 curve of heat-vs-air flow. The resulting voltage developed (I•R3) is the basis of the air speed measurement.
Okay so far. But how does compensation for Figure 1’s nonlinearity happen?
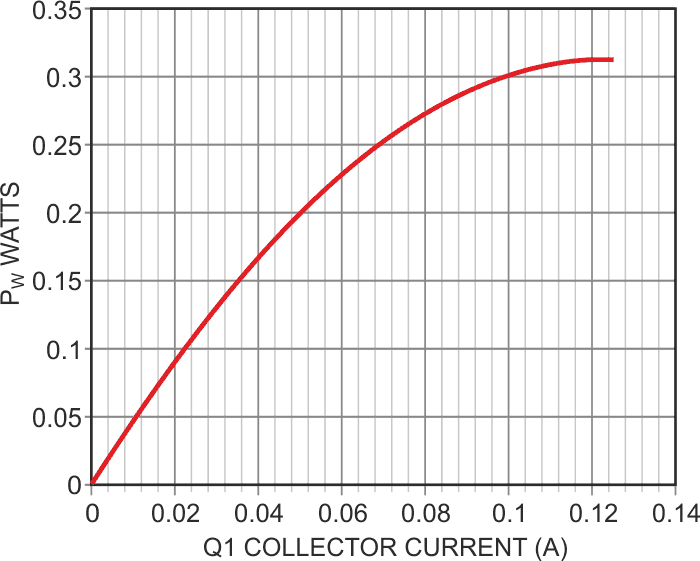
Well, it turns out the function of Q1’s PW vs collector current, I, isn’t linear either. In fact:

That quadratic I2 term is very useful. It’s responsible for the lovely curve shown in Figure 3.
 |
|
| Figure 3. | Q1 power versus collector current. |
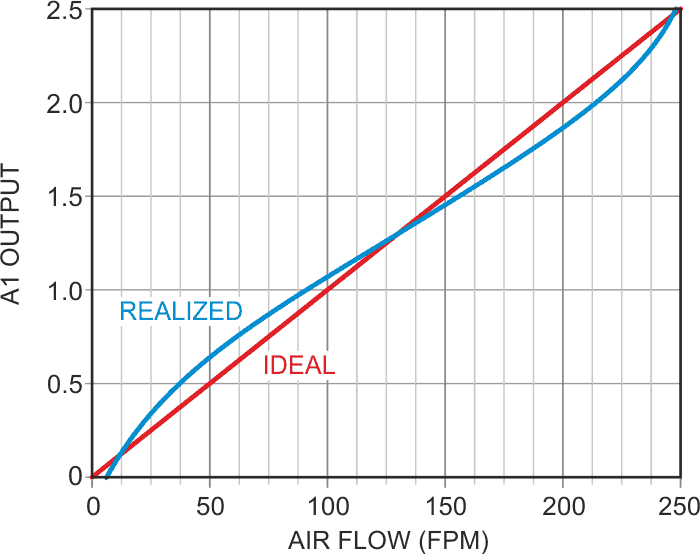
The 2nd-order curvature of Figure 3 is what compensates for the bend in Figure 1. Although the match isn’t perfect, when inverted, offset, and scaled by op-amp A1, the realized output is a calibrated readout (1 V = 100 fpm) of air speed that differs from ideal by less than ±5% from 0 to 250 fpm, as shown in Figure 4.
 |
|
| Figure 4. | Darlington anemometer output versus actual airspeed. |
The resulting sensitivity to relatively slow air flow is ideal for the measurement of cooling-fan forced-air distribution, air infiltration tracking in HVAC installations, and many similar applications where the achieved measurement accuracy and range are adequate.
Dynamic response to changes in airflow is good with a Q1 forced thermal time constant of about three seconds. Also, solid-state sensor durability is better than that of delicate hot-wire sensors.
A detail of Figure 2 worthy of mention is Q3, which I include to preclude the possibility of the A2 feedback loop getting “stuck” when a transient or other misadventure might cause R3 voltage drop to exceed 2.5 V. This is a potentially bad thing because the PW vs I curve would go “over-the-top” and invert the I vs PW feedback term from negative to positive, causing A2’s output to latch with the Darlington saturated and stay thus stuck for as long as power is provided.
If saturation approaches, Q3 conducts and forces A2 to limit Darlington drive to a safe level until the transient passes and normal temperature regulation can recover.
Another useful detail is “upside-down” regulator U1 which provides not only necessary stability for the 5 V power rail, but also “splits” input power and provides an unregulated, but still useful, negative rail for the op-amps. This simple but handy trick is described in an earlier Design Idea [1].
