Čestmír Hýbl
elbastl.sweb.cz
Introduction
Some time ago I was poking in my box of old components. I was searching something else, but I stopped when a few of nixies came up into my hand. Once upon a time (a long, long time ago) I have mined them from an old calculator.
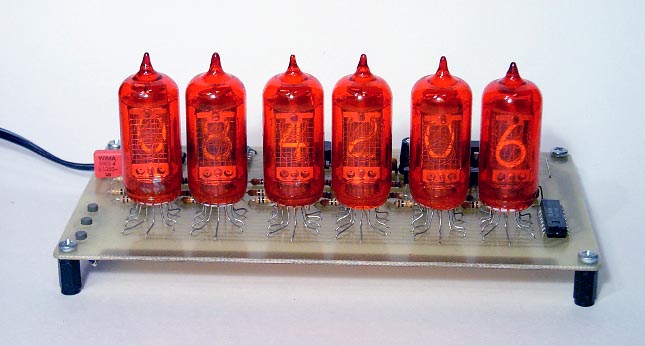
I remember… Thirty years ago 6 nixies were a small treasure. He who was able to construct nixie clock with TTL logic, he befit into category "old hand".
Nixie light was somehow warmer. A few minutes later I was tuned in the mood of vacuum tubes. Curiosity came to my mind. Would these old bulbs have operated? Now you can construct such clock easy. Just take one microcontroller…
Because I was interested in possibility of microcontroller programming with high-level language in the same time, I decided to play a little. I tried to construct easy nixie clock.
Aim of construction
The clock will have 6 digits and time setting will be done by means of a few buttons. I will try to use the most common types from widely used microcontroller families of miscellaneous producers. I will write the program in C language.
Nixies need high voltage for operation. I wanted to avoid dangerous mains line voltage. The supply voltage for the clock must be safe 12 V.
As the main target of the construction was toy, this instruction is not subtle construction with mechanical details and specified case. You can modify the clock to your taste and qualification.
The described clock accomplishes these results:
| Time display: | HH MM SS |
| Alarm display: | HH MM -- |
| Time mode: | 24 hours |
| Time accuracy: | ±1 second/day (depends on XTAL trimming) |
| Supply voltage: | 12 V |
| Supply current: | cca 100 mA |
Wiring diagram
The multiplex mode is natural solution for device with 6 digit display.
Most of blocks in the block diagram are clear. Somewhat special is converter TTL/high voltage for nixies. Anode drivers are based on high voltage NPN and PNP transistors. I took the driver here.

TTL IC 74141 ensures BCD decoder and high voltage driver for individual digits. Perhaps it will be difficult to come by 1 piece of it (I don't know if 74141 is produced still). But if you discovered nixies, 74141 could be near :-). In time of TTL logic fame the 74141 was almost exclusive alternative. So try to find one.
Nixie need voltage about 170 V. It would be useless to design special circuit for voltage converter. There is a lot of IC for step-up (boost) converters. I selected low cost and widely available MC34063. The converter circuit is almost copied from data sheet. Just only power switch is strengthened by T13. Internal switch is not suitable for such high voltage. I use choke coil as inductor for converter. Diameter is 8 mm and length is 10 mm - see the picture.

Efficiency of the converter is good and output voltage is relatively safe. The output voltage decreased to 60 V at output current 5 mA. R32 is current-sense resistor.
Power supply for logic is linear regulator U4. There is a place for reserve accumulator (3.6 V - NiMH or NiCd) in the schematic and on the board. Diodes D7 and D8 are Schottky type and R37 must limit charge current in compliance with accumulator. Accumulator, D7, D8 and R37 are not necessary if your clock will serve just for fun.
The final schematic diagram is here:
Buttons for clock setting are connected via diodes. If logic "1" is present at exact position appropriate button is tested. The small piezoelectric buzzer is connected to microcontroller output as a bonus function. Use small switch for shutting up this disgusting morning alarm. The hammer will serve as well, but it is final solution :-).
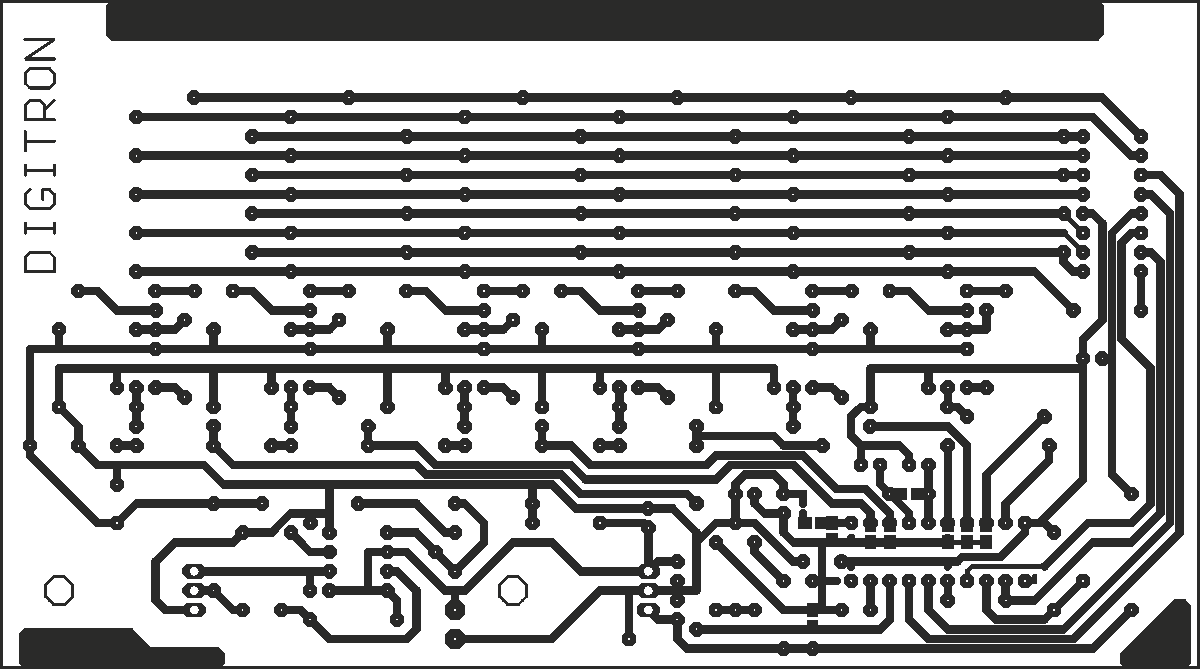
The component bill is here, PCB is here…
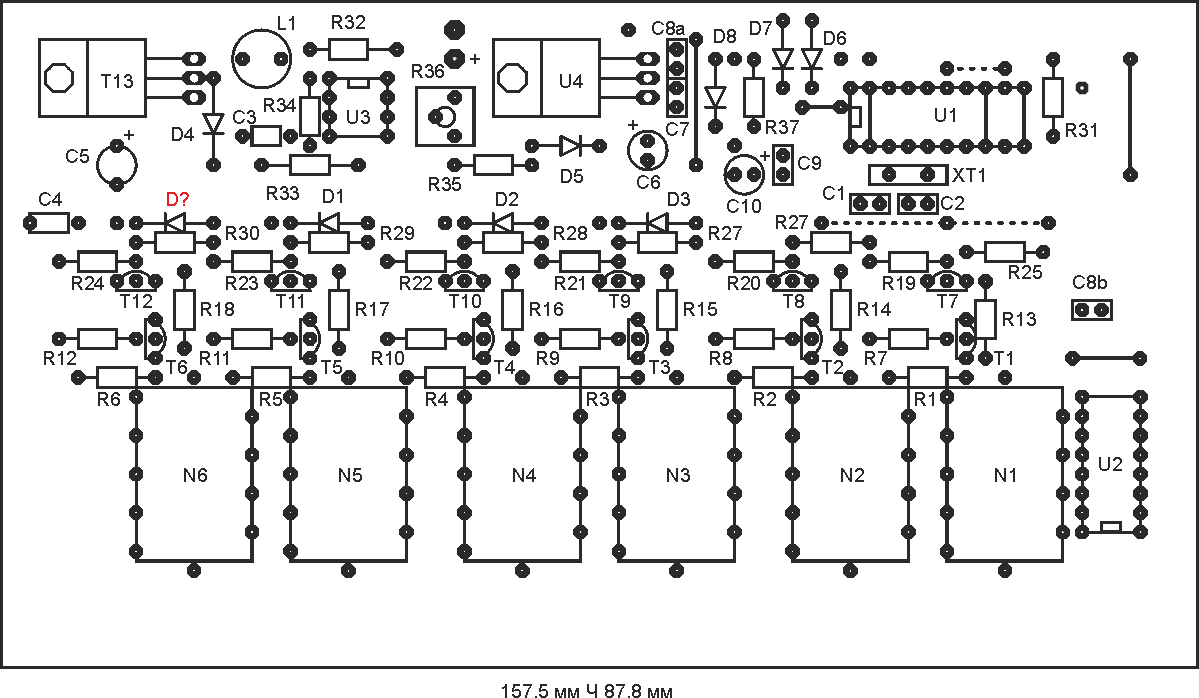
… and circuit layout is here.
Click on the picture for 600 dpi picture (save it and print).
Processor
Actually every microcontroller with appropriate number of pins can control such simple device. Minimal number of pins is:
| Function | Pins |
| Power supply | 2 |
| Crystal | 2 |
| Anode driver | 6 |
| 74141 driver | 4 |
| Button input | 1 |
| Buzzer | 1 |
| Total | 16 |
All microcontroller manufacturers design specific families and types. Pin configurations of individual types are various. I tried to design universal PCB for several microcontrollers. There is 20 pin socket on the board. You can adapt it for miscellaneous microcontrollers with a change a few wire jumpers.
Types tested by me are listed below. You can try additional types. Processor option is advantageous. Amateur of electronics applies one microcontroller family usually and his hobby corner is equipped with programmer and tools for this family. It can be problem to use microcontrollers from other manufacturers. You can choose your favorite processor below.
Ready for use is type, source and binary code, development tools and programmer.
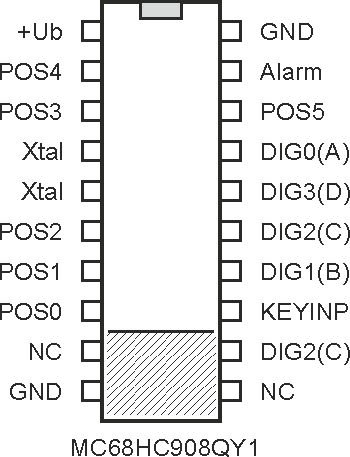
| Freescale | |
| Type: | MC68HC908QY1 |
| Crystal: | 12 MHz |
| Capacitor C1,C2: | 22 pF |
| Software: | freescale.zip |
| Setting: | — |
| Programmer: | Janus Kit (Czech only) |
| Development tools: | CodeWarrior |
Note: 10 M SMD resistor parallel to crystal.
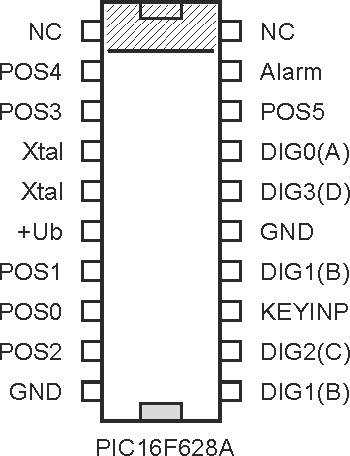
| Microchip | |
| Type: | PIC16F628A |
| Crystal: | 32,768 kHz |
| Capacitor C1,C2: | 22 pF |
| Software: | pic628.zip |
| Setting: | Internal oscillator 4 MHz - I/O RA6, MCLR OFF, WDT OFF, LVP OFF, BROUT OFF, CP OFF, PWRUP OFF |
| Programmer: | E.g. here (Czech only) |
| Development tools: | HI-TECH PICC-Lite™ Compiler + PSPad |
Note: Warning! IC is reversed in socket
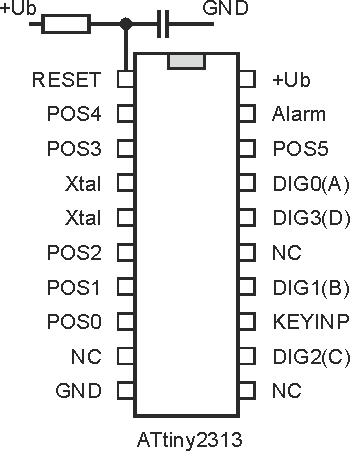
| Atmel | |
| Type: | ATtiny2313 |
| Crystal: | 12 MHz |
| Capacitor C1,C2: | 15 pF |
| Software: | attiny.zip |
| Setting: | Crystal oscillator 8 MHz, RESET ON |
| Programmer: | PonyProg, Biprog |
| Development tools: | AVR Studio 4 + WinAVR |
Note: Add SMD R and C to RESET pin (e.g. 10k and 100n)
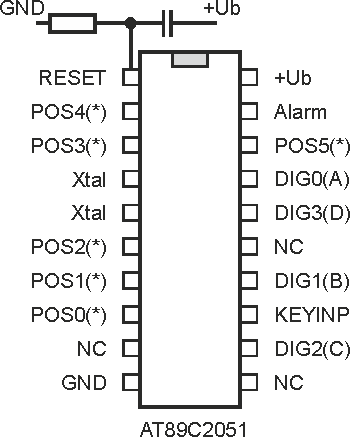
| Atmel | |
| Type: | AT89C2051 |
| Crystal: | 12 MHz |
| Capacitor C1,C2: | 22 pF |
| Software: | at2051.zip |
| Setting: | -- |
| Programmer: | PAtmel or here |
| Development tools: | SDCC + PSPad |
Note: Add SMD R and C to RESET pin (e.g. 10k and 100n), pins with asterisk connect through SMD resistor 3k3 to +Ub
If you compare source code for individual microcontrollers you can see that code is very similar. Differences are in port access, function definition for interrupt and in HW dependent part.
Source code consist of 2 sections. Function main() is responsible for port setting and starts timer for interrupt. After that it scans pressing of buttons and sets appropriate time or alarm. There is compared time with alarm in the main loop and handled buzzer as well.
The second part is timer interrupt routine. Interrupt is called over every millisecond (it depends on timer capabilities). Interrupt routine increments time variables and drives display digits. The status of buttons is tested also.
Setting in operation
Start component mounting and setting in operation with power supply. Mount U4 and components around. Check voltage 5 V for U2 and cca 4.6 V for U1. The next step is high voltage converter mounting. Use R36 to set the output voltage to 170 V. If the range of trimmer is insufficient change the value of R33 slightly. Insert U2, transistors and resistors for anode drivers and nixies. Connect U2 inputs to GND and in sequence separately connect R25 - R30 to +Ub. The nixie in this position would light. As the last HW test connect pin 19 of U1 to GND - buzzer will beep.
You can find source and compiled program for microcontroller in the appropriate ZIP file. After microcontroller is programmed check carefully every pin of U1 position and fill up needed wire jumpers and tin junctions. See the pictures for microcontrollers above. If the microcontroller is correctly programmed and connected the clock would start to operate. You can set the time and alarm. Warning! There is one more button position on PCB (spare button for future expansion :-).
Check clock accuracy. If the accuracy is out of your expectation change slightly value of C1, C2 (add small parallel capacitor or choose new value for C1, C2). Clock accuracy will improve.
Conclusion
Small 8-bits processors are ready for high level language programming already. C language is not primary intended for small microcontrollers. But you can use it very well for common applications. An assembler will be better for difficult tasks with time critical locking or with maximum load of processor. Free or limited version of C language SW tool will be sufficient for most hobby constructions.
Programming in C is similar for various microcontrollers. You have to know hardware functions (registers and function of peripheral) of your favourite type. Be careful in bit manipulation – C language is not equipped for specific bit operations – e.g. see source code for ATtiny.
Are you finished? So, tune into the mood of vacuum tubes and see…
…old times are coming… :-)

