element14
Introduction
The Raspberry Pi is a computer, and from a connections point of view it doesn’t look much different to a normal desktop computer. It has USB ports for connecting a keyboard and mouse, and a video output port for connecting up a display.
Because it is more compact and lower cost than a large desktop PC, it becomes possible to use the Raspberry Pi or other small single board computers (SBCs) as they are known, for many scenarios where a desktop or laptop PC would not be feasible.
Often you may want to connect up other ‘things’ to a computer. For example you may wish to use a computer to measure the brightness level and automatically control lights, or to sound an alarm if an intruder is detected.
Broken down to more general terms, there is a desire to be able to use a computer to control (also known as to ‘output’) to electronic circuits, and to gain useful information (aka obtain ‘input’) from circuits.
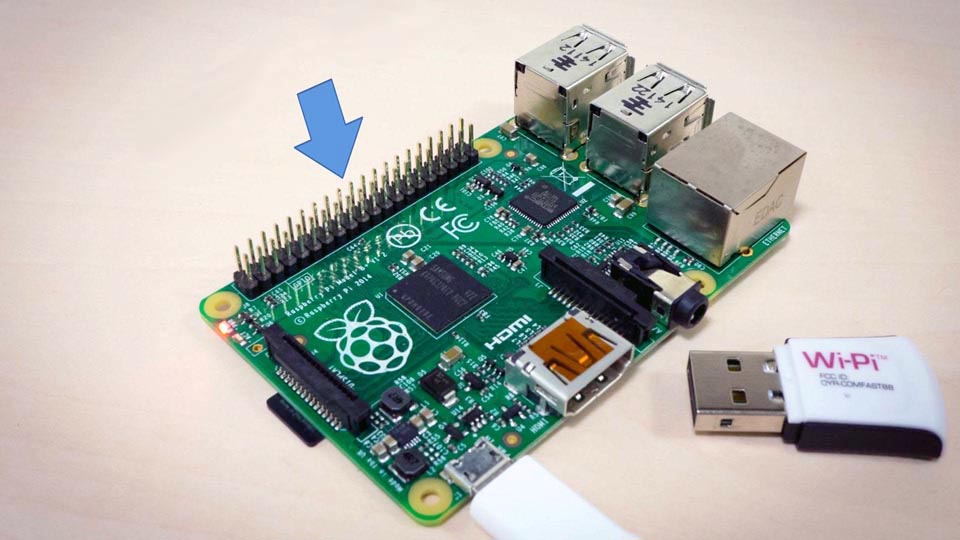
This is where the Raspberry Pi and other single board computers excel because one key difference between SBCs and desktop or laptop PCs is that SBCs usually have general purpose input/output (GPIO) capability (Figure 1). This is lacking on larger PCs.
 |
||
| Figure 1. | Raspberry Pi general purpose input/output (GPIO) connector. | |
By making connections to those pins (they are also known as header pins) the Raspberry Pi can interface to the electronic world which consists (amongst other things) of sensors and indicators and actuators.
This blog post will provide example circuits that can be used as-is (or can be modified and extended) along with code examples in several programming languages.
Connections Overview
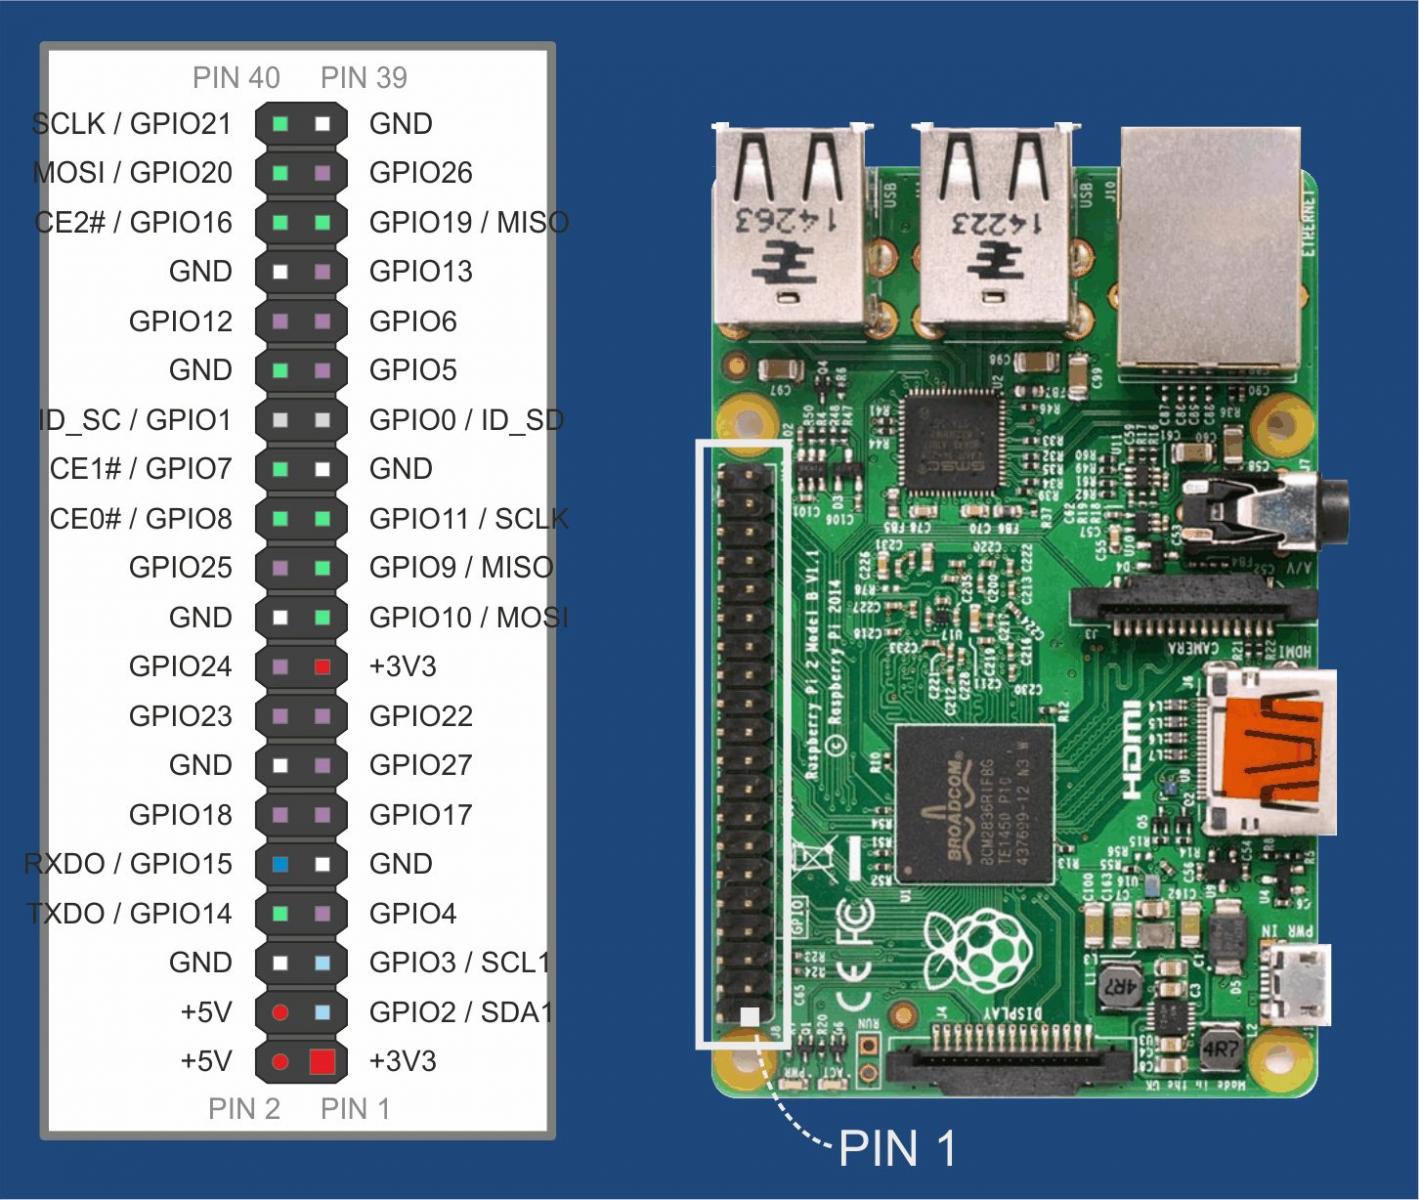
The diagram below (Figure 2) lists the header pins available on the Raspberry Pi. Pin 1 on circuit boards can typically be identified by looking for the square-shaped pad on the underside of the board. The Raspberry Pi has digital inputs/outputs on its 40-pin connector that comply with 3.3 V logic levels.
 |
||
| Figure 2. | Raspberry Pi has digital inputs/outputs on its 40-pin connector. | |
3.3 V logic levels means that the Raspberry Pi will interpret anything very close to zero volts as a logic ‘0’ and anything higher than around 2 V as a logic ‘1’. Inputs beyond 3.3 V will damage the board. Similarly, when GPIO pins are configured to become outputs, the Raspberry Pi will set the pin to either a voltage close to 0 V or a voltage close to 3.3 V.
For this blog post, the pink, white, red and orange pins on the diagram will be used. The remainder pins are for serial interfacing use which is addressed in other blog posts.
If you are not using the two 5 V pins (bottom-left side, pin numbers 2 and 4) then you could prevent accidental shorts to surrounding pins by placing some plastic sleeving/insulation over them.
Understanding Raspberry Pi Outputs
Getting Started with Digital Outputs: Lighting LEDs
A typical use for output pins is to control an indicator such as an LED or light bulb, or some actuator or motor. Usually an electronic circuit is needed to transform the Raspberry Pi output into something that will control the desired device. For a small LED all that is needed is a series resistor; its purpose is to reduce the current that will flow through the LED in order to protect both the LED and the Raspberry Pi. Not a lot of current can be supplied by the output pins, and LEDs will be damaged by too high current. Furthermore LEDs are non-linear and will not light at all if too low a voltage is applied across them. Small LEDs (particularly red, yellow and green ones) will work fine with the Raspberry Pi outputs provided a resistor is attached in series. The exact resistance doesn’t matter; anything between 100 Ohms and 1 kOhm should allow for sufficient output brightness when the output is set to logic ‘1’.
 |
||
| Figure 3. | Raspberry Pi general purpose input/output (GPIO) connector. | |
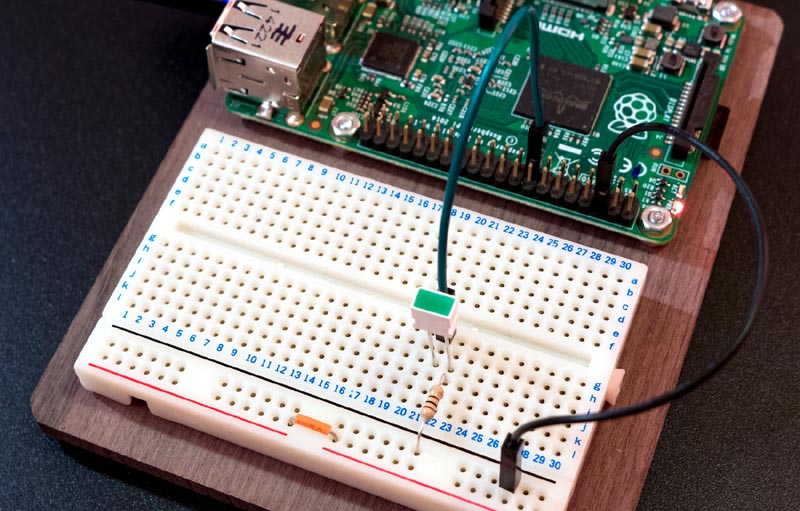
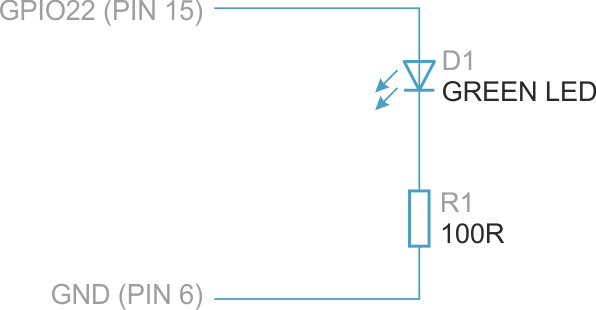
As a quick exercise the photo (Figure 3) here shows the Raspberry Pi connected up to an LED using jumper wires. To prevent accidental shorts and for convenience the Raspberry Pi was bolted onto a piece of wood (2 mm or 2.5 mm diameter bolts; 3 mm will not fit) and a bread board glued next to it. Schematic diagram for this example is shown on Figure 4.
 |
||
| Figure 4. | Schematic Diagram: Connecting LED to Raspberry Pi GPIO 22. |
|
A bread board, a single resistor and an LED were connected up to the Raspberry Pi. The GND (also known as 0 V) connection was taken from pin 6 on the Raspberry Pi header, and the GPIO pin used was GPIO22 (see the diagram earlier) which is pin 15. Any GPIO pin could be used; they are marked in pink on the earlier diagram. Another way of representing this is shown in the schematic below.
Once you’ve connected up the LED, a program or script can be written to control it. The choice of language is up to you. One (popular) example is Python; here is some code that will light up the LED.
Listing 1. Python code that will light up the LED.
# Connect LED to GPIO22 (pin 15)
import time
import RPi.GPIO as GPIO
GPIO.setmode(GPIO.BCM)
GPIO.setup(22, GPIO.OUT)
GPIO.output(22, True)
time.sleep(3)
GPIO.cleanup()
Save the code to a file called led-test.py and then to run it, type
sudo python led-test.py
Here is another example in Python. It flashes the LED 10 times (Note: if you're new to Python, unlike other programming languages the line indentations in the code are important):
Listing 2. Python code that will flashes the LED 10 times.
# Connect LED to GPIO22 (pin 15)
import time
import RPi.GPIO as GPIO
GPIO.setmode(GPIO.BCM)
for x in range(0,10):
GPIO.setup(22, GPIO.OUT)
GPIO.output(22, True)
time.sleep(0.05)
GPIO.output(22, False)
time.sleep(0.45)
GPIO.cleanup()
Another way to control the output pins is to use a shell script. This appears slightly more complex (unless you enjoy writing shell scripts) but is a good thing just for reference because often other programming languages allow you to run shell scripts, and therefore if needed this can be a quick approach to using GPIO with other languages. Furthermore the method described here is standard across different platforms so your code can be ported to boards other than the Raspberry Pi too. If you're a beginner to programming, stick with Python for now and move on to the next example; shell scripts can be revisited at a much later stage.
Listing 3. Shell-script that will light up the LED.
#!/bin/sh
GPIO_PATH=/sys/class/gpio
LED_PIN=22 #GPIO 22 is pin 15
echo "$LED_PIN" > $GPIO_PATH/export
echo "out" > $GPIO_PATH/gpio$LED_PIN/direction
echo "1" > $GPIO_PATH/gpio$LED_PIN/value
sleep 1
echo "$LED_PIN" > $GPIO_PATH/unexport
The first line of the shell script looks like a comment line, but is needed to make it easy for the Linux shell to know what to do with the script upon execution, so don’t modify that. The remainder script lines are used to take control of a GPIO pin, set it to become an output, set it to a logic high value, and then wait for 1 second. Finally control of the GPIO pin is released so other programs can make use of it if desired.
Another programming language that may be encountered is C or its (far) bigger brother C++. An example using C or C++ is given further below in the ‘Voltmeter’ section where the code is used for input from a circuit, and output to an LED.
Another Output Example: Tone Generator
A more interesting example than an LED is to use a couple of GPIO pins to control a tone generator circuit. The Raspberry Pi has a headphone connector for audio but sometimes just a simple tone or alarm is needed to signal events (such as for an alarm clock project).
 |
||
| Figure 5. | Simple Tone Generator connected to two RPi GPIO. | |
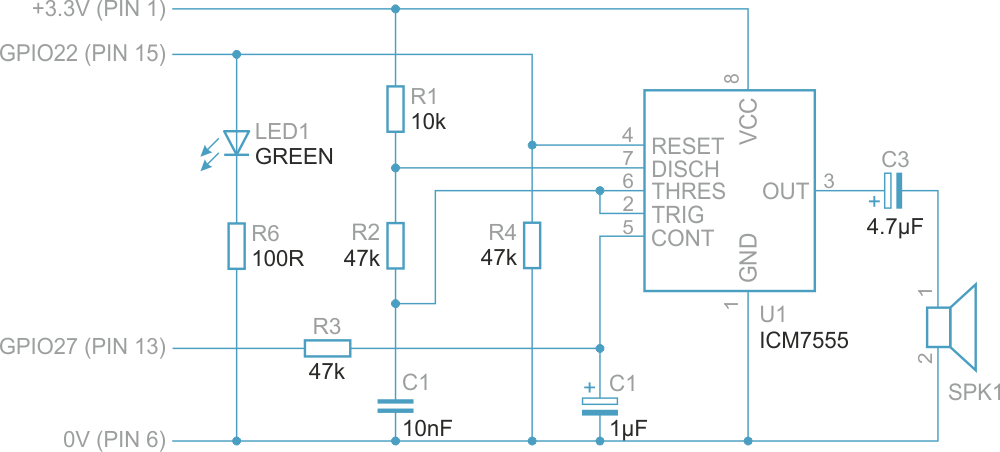
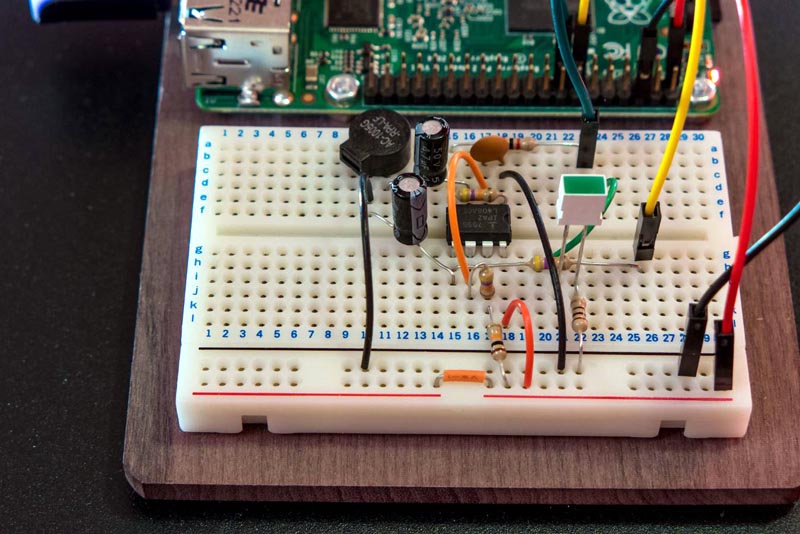
The photo below (Figure 5, 6) shows a very simple single integrated circuit (IC) project that can generate various sounds. By adjusting resistor and capacitor values, different tones and sounds could be created.
 |
||
| Figure 6. | Tone Generator circuit on bread board. | |
The circuit connects to two outputs from the Raspberry Pi. One output is used to switch the tone on or off, and the other is used to alternate between two tones. One of the capacitors in the circuit is used to create a sweeping tone transition when tones are alternated. The circuit diagram is shown below; it uses an ICM7555 timer integrated circuit. GPIO22 was used to switch the tone on and off, and GPIO27 modifies the tone. C1, R1 and R2 can be adjusted to select the desired tones.
The Python code below plays some alarm tone effects. To use the code, save the code to a file called tone-test.py and then type
sudo python tone-test.py.
Listing 4. Python code for control tone generator and plays some alarm tone effects.
import time
import RPi.GPIO as GPIO
GPIO.setmode(GPIO.BCM)
GPIO.setup(22, GPIO.OUT) # TONE_ENABLE
GPIO.setup(27, GPIO.OUT) # TONE_CHANGE
GPIO.output(22, True)
for x in range(0,5):
GPIO.output(27, True)
time.sleep(0.1)
GPIO.output(27, False)
time.sleep(0.2)
GPIO.output(22, False)
time.sleep(0.5)
for x in range(0,5):
GPIO.output(22, True)
time.sleep(0.1)
GPIO.output(22, False)
time.sleep(0.2)
GPIO.output(27, True)
time.sleep(0.2)
for x in range(0,5):
GPIO.output(22, True)
time.sleep(0.05)
GPIO.output(22, False)
time.sleep(0.05)
for x in range(0,10):
GPIO.output(22, True)
time.sleep(0.1)
GPIO.output(22, False)
time.sleep(0.1)
time.sleep(1)
GPIO.cleanup()
Note that the circuit uses the 3.3 V supply (pin 1) available from the Raspberry Pi. Only use this supply if you know your circuit doesn’t consume much power. More than a few tens of milliamps of current consumption would require your own external power supply. Another approach would be to build a 5 V to 3.3 V regulator circuit and connect it to the 5 V supply available on pin 2 from the Raspberry Pi.
Output Design Tips
All the circuits described so far have involved low current and low voltage but sometimes higher power devices need to be controlled or monitored. There are some typical methods to achieve this, and they are described here.
Connecting to 5 V Logic
When the Raspberry Pi is used to output a signal to 5 V devices, usually no additional circuit is needed; 5 V logic device inputs will function just fine with the 3.3 V logic output signals from the Raspberry Pi.
Low Power, Low Voltage LEDs (red, yellow, green)
A single LED can be controlled using a series resistor between around 100 Ohms and 1 kOhm. No other considerations are required.
Any Color Low Power LED
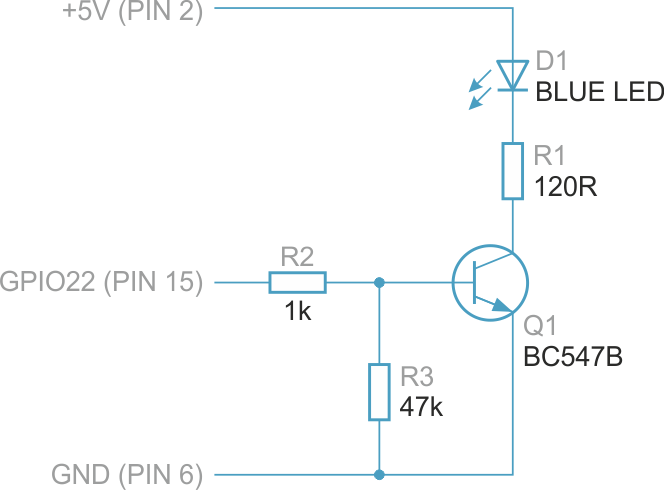
Blue and white LEDs may require a voltage higher than 3.3 V. The easiest way to control a single LED is to use a transistor circuit to switch the 5 V supply rail (Figure 7). The value of R1 should be increased if using an LED of any color other than blue or white. In general consult the LED data sheet. Any NPN transistor should work for this circuit.
 |
||
| Figure 7. | Control LED using a transistor. | |
Higher Power AC or DC Devices (but not mains!)
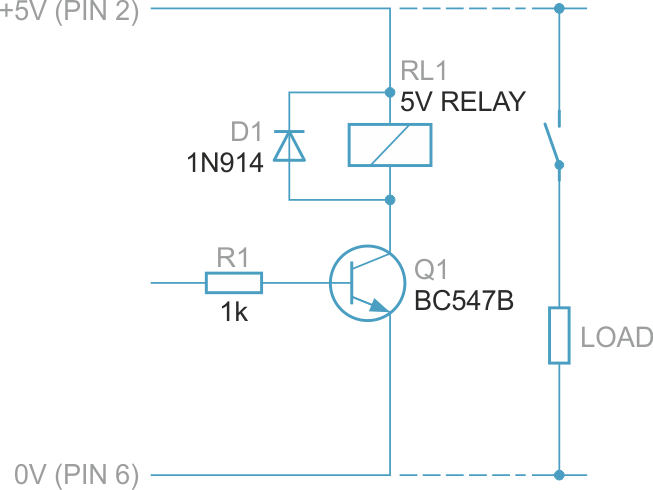
A relay is useful for this scenario. Virtually any NPN transistor can be used (Figure 8). Popular devices include BC547B, 2N3904 and BC549. If the connected device can function from 5V DC then the Raspberry Pi's 5 V connection on pin 2 of the 40-pin header could be connected to the relay switch as long as the required current is not too high (use 100 mA as a very conservative guideline) otherwise the relay switch can be connected to an external supply (take care it doesn't accidentally short to the 5 V supply or any other connection on the Raspberry Pi – keep it totally isolated). Check the relay datasheet to confirm that it is suitable for your needs.
 |
||
| Figure 8. | To control High Power AC or DС devices use a relay with transistor. | |
A small relay with pins convenient for breadboard layout is Finder 32.21.7.005.2000 and it can switch up to 6 A. Note that just because a relay is rated for (say) 250 V does not mean it can be used for this. Breadboards and stripboards are designed for far lower voltages. Even with a custom PCB the project should not be used at mains voltages because there are legal requirements for conductor spacing, temperature, types of enclosure material, connection type, conductor clamping method and so on. It is easy to create a product that will fail and cause personal injury or an electrical fire or harm others at some point in time.
Mains Powered Devices
Treat any circuit or product that directly controls mains devices from a Raspberry Pi with extreme suspicion. Most do not meet safety standards (even though some firms self-certify that they do meet safety standards when clearly their products do not). Instead, a reasonably safe method is to find a reputable remote control product from a reputable manufacturer and a reputable supplier that uses infra-red or wireless (radio) technology to control the mains device. In the UK, the Energenie RF controlled mains sockets appear suitable and they provide a small radio transmitter board that directly plugs onto the Raspberry Pi 40-pin connector (Figure 9) and they also supply example Python code for it. For an examination of the hardware and software click to see Energenie Experiments - Remote Power Control for the Home.
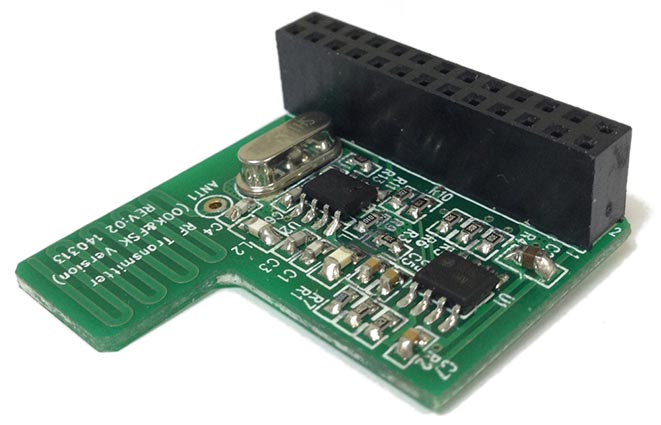 |
||
| Figure 9. | Energenie's Pi-mote control board for RF controlled mains sockets. | |
Multiple Relays, LEDs or Devices that require less than 200 mA Current at 12 V
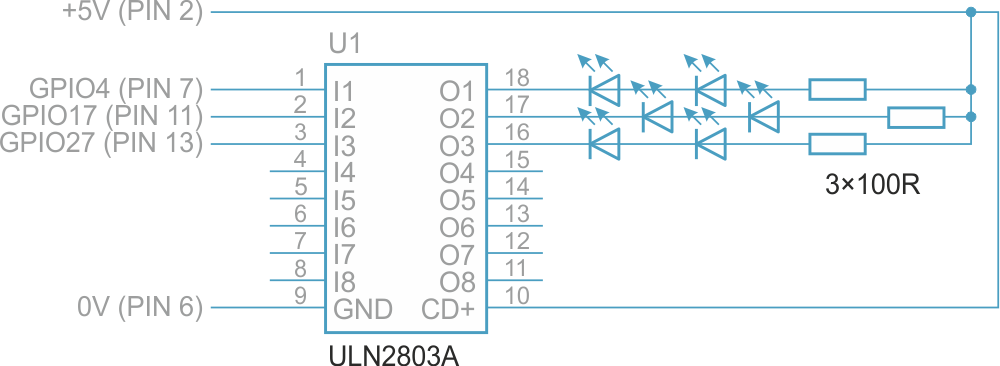
The ancient (>25 years in production!) yet useful ULN2803A integrated circuit can be employed for this scenario (Figure 10). Several hundred milliamps can be supplied by each output pin (there are 8 of them).
 |
||
| Figure 10. | ULN2803 can be used for control multiple relays, LEDs or Devices that require less than 200mA Current at 12 V. |
|
Driving small DC Motors (the most common motors, also known as ‘Brushed DC’ Motors) and Stepper Motors
For small motors consider the Gertbot motor control board. It can drive several brushed DC motors if needed, and can also be used for stepper motors.