Use this circuit to tell which game player presses a button first.
Vasil Borodai
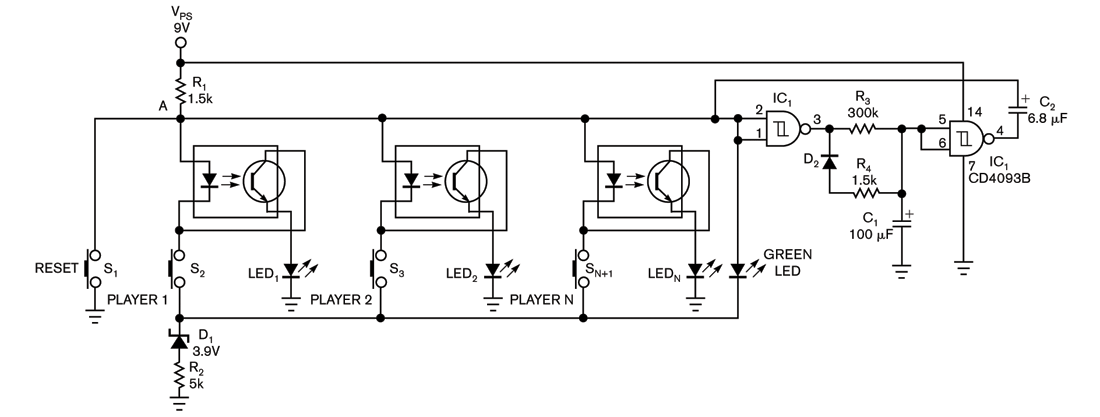
The circuit in Figure 1 lets you indicate which game player presses a button first. Each button has a corresponding LED that indicates the pressing of the button. All other LEDs remain locked out until someone presses a reset button. When a player presses a pushbutton, the corresponding optoisolator turns on, which illuminates the appropriate indicator LED. The LED remains on after the player releases the pushbutton. The voltage at Point A pulls down to nearly 3.7V, which you determine by adding the forward voltage of the optoisolator’s internal LED, the phototransistor’s voltage, and the LED’s voltage: 1.3+0.6+1.8V=3.7V. The green LED then turns off.

Click, for enlarge
Figure 1 This circuit lets you indicate which game player presses a button first.
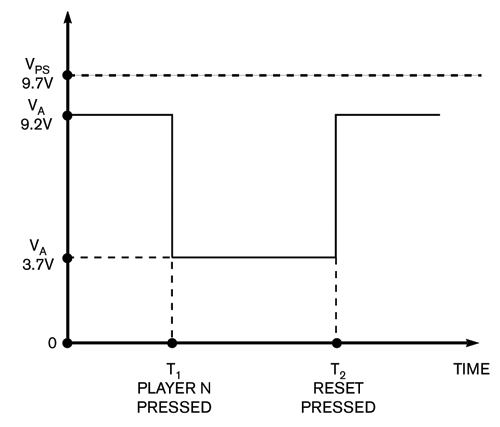
Beginning at time T1 (Figure 2), no other player can change the situation by pressing a pushbutton because switching on any other optoisolator requires a voltage exceeding 3.9V. Resistor R1 depends on VPS such that R1=(VPS–VD1)/IOPTOLED, where VPS is the power-supply voltage, VD1 is the voltage of diode D1, and IOPTOLED is the current of the optoisolator LED. Thus, for a 9V power supply, R1 has a value of 1.5 kΩ. When a player presses the reset button, the player LEDs turn off, and the green LED illuminates. The voltage at Point A returns to 9.2V (time T2 in Figure 2).

Figure 2 When a player presses the reset button,
the player LEDs turn off, and the green LED illuminates.
The voltage at Point A returns to 9.2V.
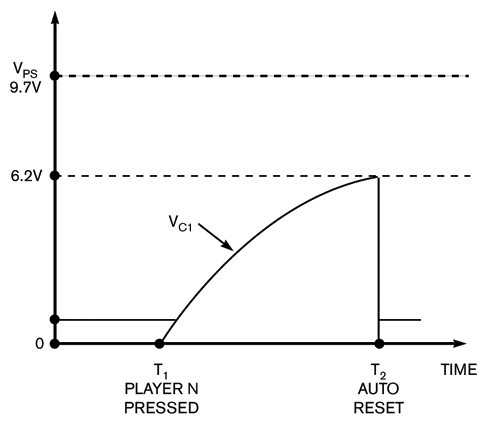
You can also add an auto-reset feature to the circuit. When Point A drops to 3.7V (time T1 in Figure 3), the inputs at IC1, pins 1 and 2, go low, and the output at Pin 3 goes high, charging C1. After about 30 seconds (time T2 in Figure 3), C1 has enough voltage to force IC1’s Pin 4 low. R3 and C1 determine the charging time. A pulse of current flows through C2, which forces the voltage at Point A to nearly 2V. That action momentarily interrupts the current in any optoisolator LED. As a result, the circuit automatically resets, and the green LED lights. IC1’s Pin 3 goes low, which discharges C2 through R2, resetting the circuit to its original state.

Figure 3 When Point A drops to 3.7V, the inputs at IC1,
pins 1 and 2, go low,
and the output at Pin 3 goes high, charging C1.