Despite the title, this DI does not describe a gadget to tell you when to don your shades, but instead features a useful add-on to (analog) audio kit. Built into a mixer, for example, it will show when the output of any stage is approaching clipping, perhaps due to excessive bass or treble boost. Built into a project box as a stand-alone unit, it’s handy during circuit development. It may not show you where the problem is but will show that some stage is in danger of becoming overloaded. It’s shown in Figure 1.
The outputs of the circuits to be monitored – as few or many as you choose – are each connected to a pair of the input diodes. The most positive and negative peaks of the inputs, less than a diode drop, then appear across R1. The inputs are not measurably loaded, nor is there any significant interaction between them.
 |
|
| Figure 1. | The diodes combine the signals to be monitored, and the comparators check if any of them is close to your chosen limit, either negative or positive. If so, the LED flashes. |
Comparators A1 and A2 check those peak voltages against references determined by R2/3/4, their commoned outputs pulling low when the relevant limits are exceeded. That rapidly discharges C1, turning on Q1 and thus LED1. C1 slowly charges back up through R5 and R6, holding Q1 on while it does so. Q2, an n-channel JFET, is used as a constant-current diode, limiting the LED current to its IDSS or saturation drain current value, which is around 7–8 mA for the 2N5485 shown and largely independent of rail voltages from <9 V to >30 V. Make sure the device can withstand the peak supply voltage, though data sheet values are usually conservative. When built into equipment where the supply is fixed, a suitable resistor can be used instead, but a JFET is best for the stand-alone version, where supplies will vary.
With the values shown, peaks of >~10 µs will be detected, corresponding to a half-cycle at 20 kHz, giving LED flashes of ~20–50 ms duration depending on the supply voltage. If that voltage is great enough to cause breakdown of Q1’s gate-source protection diodes, the flash time will be reduced somewhat as R5 will effectively be partially shorted, but no damage will occur owing to the high resistor values. For a longer flash time, increase R5/R6; increasing C1 will slug the response time. DC levels above or below the relevant limits will turn the LED on continuously.
Only +V and -V power rails are needed, a central ground being unnecessary, so it can freely be used with either single or split supplies up to a total of 30 V or so. Connecting C2 across the supply right by the LED is good practice, though the latter’s current pulses are small. An extra decoupling cap across U1 is not needed.
To allow for different power-supply voltages, input swings, and headroom, it’s only necessary to change R3, which may be found by using the following equation:
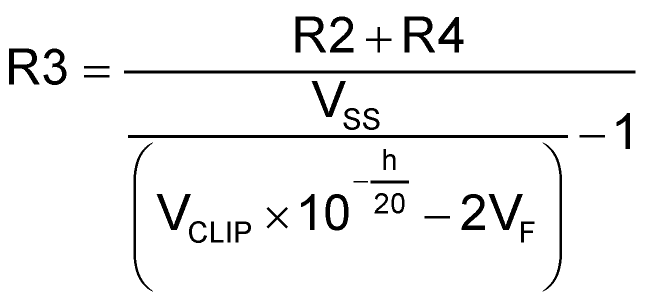
where:
R2 = R4 = 10k,
VSS is the total rail-to-rail supply voltage,
VCLIP is the pk-pk voltage, at clipping, of the stages being monitored,
h is the chosen headroom in dB,
VF is a p-n diode’s typical forward voltage, say 600 mV.
A couple of examples: With ±15 V rails, a ±14 V maximum input swing, a choice of 3 dB headroom, and R2 = R4 = 10k, R3 comes out as 32,736 Ohms; or 33k. A single 12 V rail, a ±4.5 V input swing, and 2 dB headroom gives 19,663 Ohms, or 20k, for R3. (For the stand-alone version, I used a 50k pot plus a 10k resistor to cover all eventualities.)
Note that the voltage across R2 must be greater than 2 V, or the LM393 will misbehave. While it can sense at or below ground, though that does not concern us here, at least one input of a comparator must be more than 2 V below the positive rail.
While not shown on the schematic, the input lines should use screened leads (the screens being earthed, naturally) preferably with a few hundred ohms at their input ends to isolate the stages being monitored from the leads’ capacitance.
Simple as this circuit is, I have found it helps to give warnings of mismatches between the gains of cascaded audio stages. In use, it will normally be just flickering on musical peaks; if not, you are probably not using your full dynamic range or S/N ratio. If it’s flashing much of the time, that may just be down to Mahler, Wagner, or death metal, but if it’s solid, check for a blown op-amp somewhere! Of course, you may have heard the effects anyway.