Psychologists tell us that frustration increases drive. I was driven to produce the circuit in this design idea by my increasing frustration with a collection of digital thermometers, all of which claimed accuracy to within 0.1 °C but the readings of which were mismatched by anything up to a couple of degrees, showing a serious lack of precision.
Such thermometers generally use thermistor sensors, which have a roughly exponential relationship between temperature and resistance. That is tricky to convert into a usable signal with good linearity over a wide measurement range. Alternatives are thermocouples, with their low voltage outputs, and resistance temperature detectors (RTDs) (Ref. 1), which use the temperature coefficients of metals, usually platinum, to give decent outputs which are linear with respect to temperature over a wide range.
 |
|
| Figure 1. | A bridge incorporating an RTD produces a voltage output related to the temperature, but usually with an offset 0 °C point. |
The final impetus for this project came from the discovery of some long-mislaid PT100 RTD sensors, which enabled something fairly precise: a box to convert the RTD’s resistance into a millivolt signal which could be read directly on a standard digital multimeter (DMM). As usual, I have tried to push a simple design to its limits and to wring every last ounce (or milli-Kelvin) of performance from it.
RTD basic circuit
RTDs are generally used in bridge circuits as shown in Figure 1.
R1 and R2 feed current through the RTD and R3, whose resistance is around the mean value of the RTD’s. The voltage across the bridge is then nearly proportional to the temperature, but with an offset. Note that weasel word “nearly”! For an exactly linear relationship between sensor resistance and temperature, R1 and R2 would need to be infinite, implying an unhelpfully infinite drive voltage – or they could be replaced with matched current sources, as in Figure 2.
PT100 RTDs, which use (precisely doped) platinum wire or film, are defined to have resistances of 100 Ω at 0 °C and 138.5 Ω at 100 °C. Using identical currents in each leg of the bridge means that if the reference resistor R3 is 100 Ω, the bridge will be perfectly balanced at 0 °C, with zero voltage between the output terminals. If the currents in each leg are set to (∆T°/∆R), or (100/38.5) = 2.597…mA, the differential output voltage will change by exactly 1 mV/°C. Measuring that output with a DMM on its millivolt range will then show the temperature directly.
Practical RTD circuit
Figure 3 shows how to do this for real.
 |
|
| Figure 3. | A practical circuit capable of delivering exactly 1 mV/°C. |
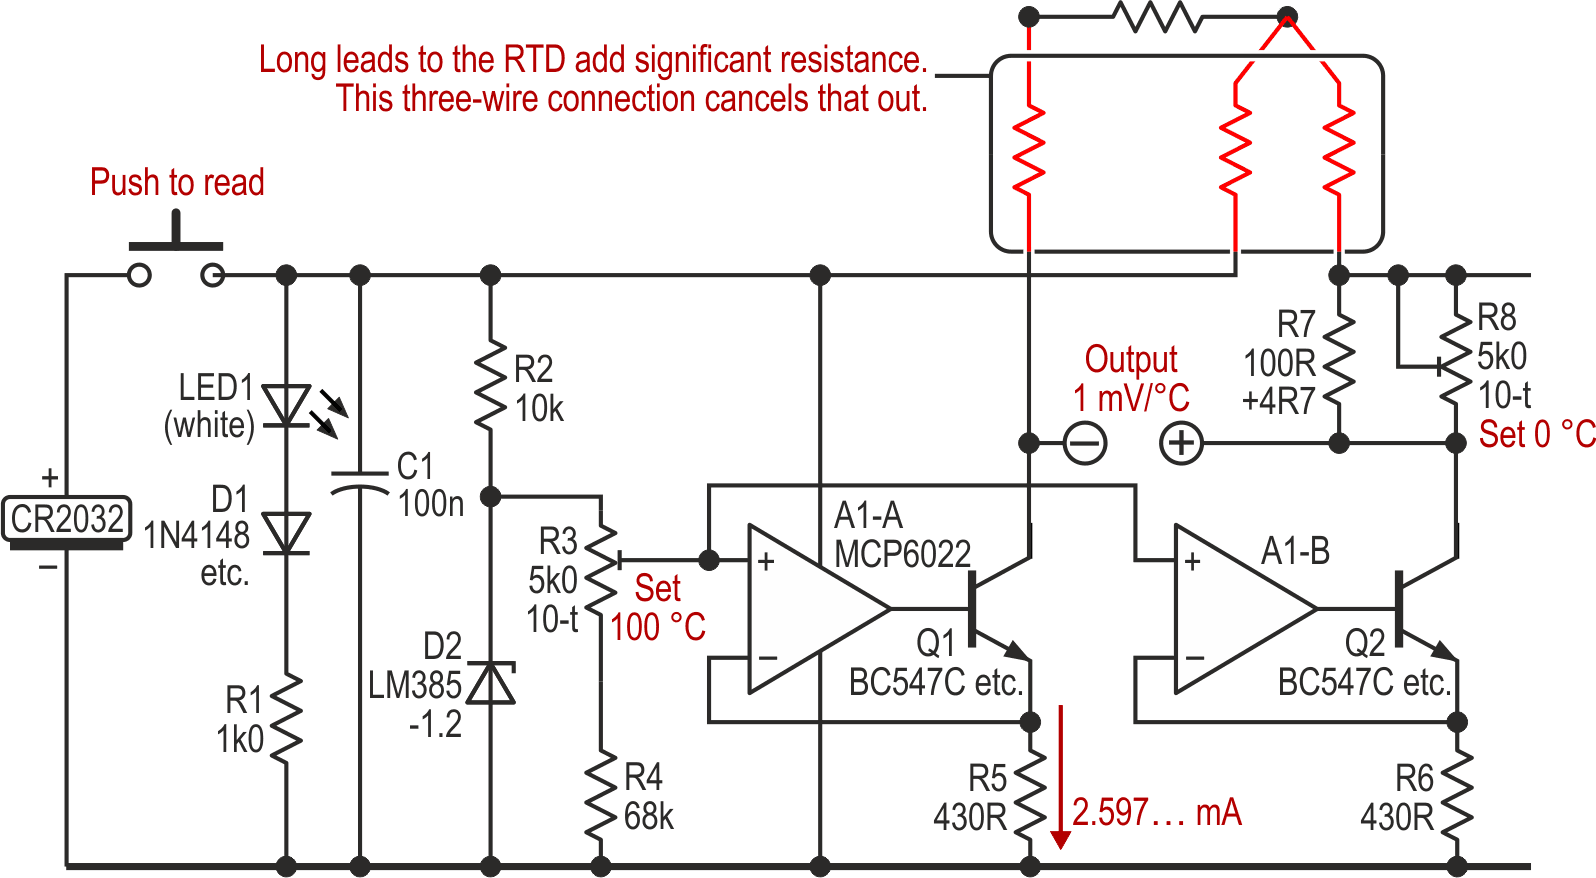
A1-A/Q1/R5 and A1-B/Q2/R6 form the pair of constant-current sources – or rather sinks, since we have turned the circuit upside down. The common reference for each comes from D2, a precision 1.24-V reference, potted down to about 1.12 V, which is of course the (theoretical) voltage that 2.597…mA produces across 430 Ω. The differential voltage across the outputs is now just what we want: 0 V at 0 °C and 100 mV at 100 °C. (In a perfectly-designed world, where TCRs stayed constant from absolute zero to 2044 K – the melting point of platinum – we’d be using a current of 2.7315 mA.)
The other odds and ends to the left of the schematic are boring practicalities: a CR2032 3-V coin cell, a push-to-read switch, as well as a series diode and resistor feeding a white LED which just dims out at the minimum usable battery voltage of about 2.7 V, where the second decimal place starts to wander. (That power/low battery indication is adequate for lab use, if rather basic.) Consumption measured around 8 mA.
Calibration is necessary but easy. To set the 0 °C point, immerse the RTD in crushed, melting ice and adjust R8 for zero output voltage. Then hang it in the steam above the water in a kettle just off the boil and trim R5 for an output of 100.0 mV. That’s it!
Considering error
It works. It’s simple. It’s correctly set up. What could possibly go wrong?
Firstly, there are the connections to the RTD, with their own resistances adding to that of the sensor. This unit only needed a meter or so of cable as it was purely for lab use. The length of 18 AWG (~1 mm2) wire has a loop resistance of ~90 mΩ, giving an error of ~0.02 °C: ignorable, as is the second-order effect of the temperature coefficient of resistance (TCR) of the copper leads themselves. However, many RTD assemblies (as opposed to basic sensor elements) come with three wires, allowing a configuration where this error completely cancels out, assuming that all wires have the same resistance, as shown in Figure 4.
 |
|
| Figure 4. | Three-wire connection to the RTD allows cancellation of the cable’s resistance. |
Secondly, there is self-heating of the sensor. Most RTD circuits use a 1-mA sensing current, but our ~2.6 mA will dissipate more, around 1 mW. Basic RTD elements are quoted as having thermal resistances of about 20 °C/W, so the error may be +~0.02 °C, depending on the medium in which the device is immersed and whether that is still or moving. In still air, it could read at least 0.1 °C higher than in flowing water. If you are going to use it in air, it’s probably best to set the zero point with the RTD in a cavity surrounded by ice and water rather than immersed in those.
Next, there will be offsets and mismatches in the circuit, which will balance as long as the two current sinks have the same errors, which can be calibrated out. Q1 and Q2 should be matched for hFE because their base currents produce slight excess voltages across R5 and R6, and those need to match for the best temperature stability. (This is really finicky. The sensor may be swinging wildly in temperature, but the measuring circuitry should not be. And the LM385-1.2 reference has a very low voltage tempco in the room-temperature region.)
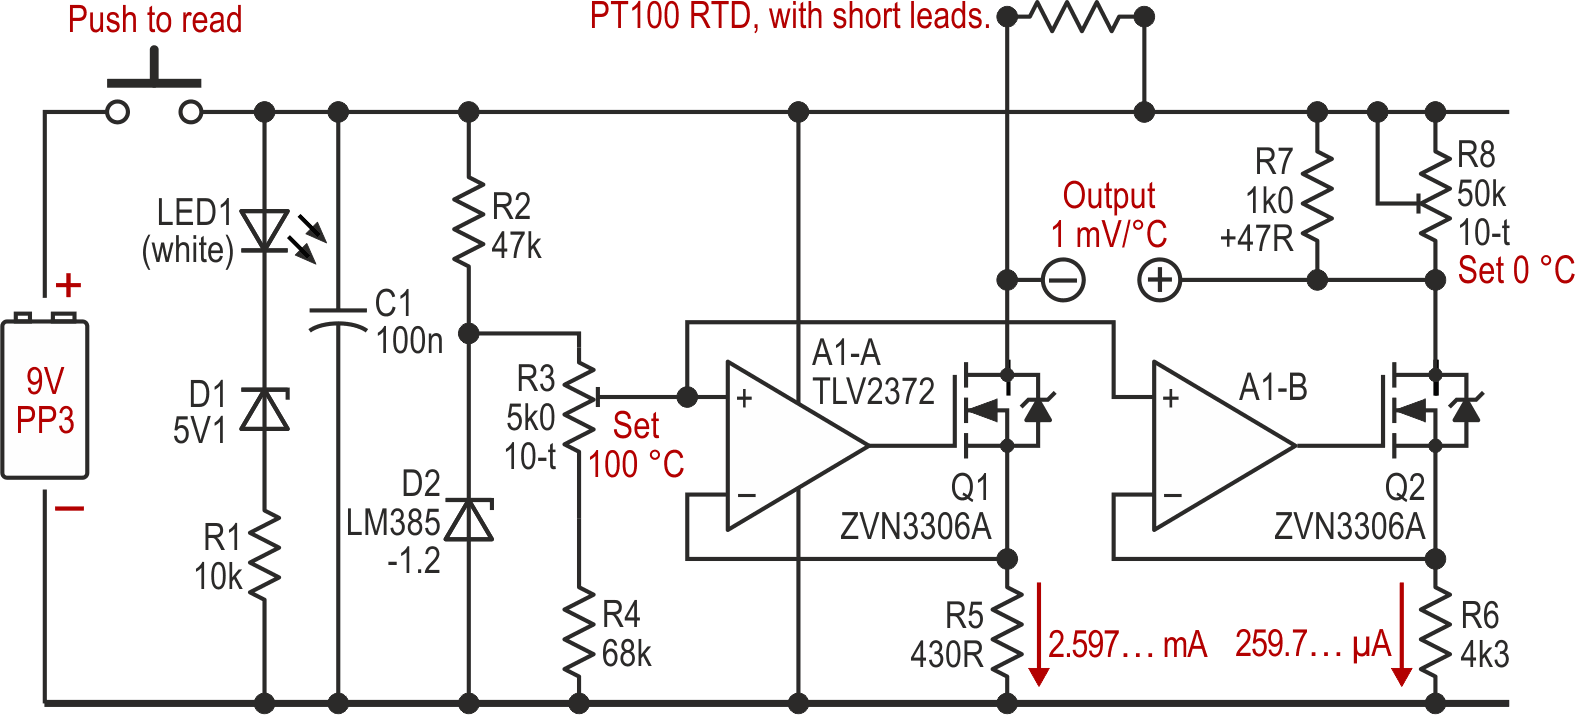
Using MOSFETs for Q1/2 would have been preferable, their gate currents being zero(ish), but the 3 V supply did not allow that, at least with the devices on hand. The finite but high values for the sinks’ compliances can be ignored.
Other errors in the 0° and 100° calibration points are possible. The ice for your calibration bath should ideally be made from distilled or at least de-ionized water. (For the curious differences between waters, see this article (Ref. 2), and then ignore its implications for this device.)
Boiling point is trickier. At sea level with the atmospheric pressure at 1 bar, its precise value is defined as 99.97 °C. The drop in pressure with height reduces water’s boiling point by about 1° for every 300 m increase. Check your altimeter and barometer and adjust accordingly. This (Ref. 3) is a useful tool for doing so.
Lastly, there is the DMM with which this will be used. The 10-MΩ input resistance of most meters will introduce only a tiny error, which will be compensated for during calibration. Use the highest-resolution meter you must set zero degrees but your target meter for the 100 °C point to avoid any meter-calibration issues. Even the cheapest meters (sub-$/£/€5) usually have a 199.9 mV range; why not get one and keep it for thermometry?
Despite all the above fussing and dooming and glooming, only a little care is needed to achieve 0.1 °C precision, which is much better than most thermistor-based thermometers can offer. For greater resolution, with another (accurate but imprecise) decimal place, use a 4½-digit meter for the readout. Professional metrologists may quibble over some of the details, but I hope not too violently.
Those MOSFETs for Q1/2 that we met earlier but rejected: with a higher supply voltage and a different op-amp, they can still be used. A TLV2372 (RRIO) would be ideal, but an LM358 works well, as it can sense down to ground and (just) drive up to the positive rail, with input offset currents which are adequately low and fairly constant. In the test, using ZVN3306A MOSFETs, that variant gave stable results with a supply ranging from 4.6 to 30 V. (R2 was increased for the higher voltages.)
Unequal bridge currents
So far, the currents in the two legs of the bridge have been equal, but they need not be, as the reference current defining the 0 °C point can be much lower. Increasing R6/7/8 by ten times or so saves a couple of milliamps with no practical downsides that I can spot, especially when using the MOSFETs. The leads to the sensor must then be short, because the lead resistance compensation scheme shown in Figure 4 only works with equal currents. My Mark 2 version, shown in Figure 5, uses this 10:1 current ratio along with other changes to suit the 9-V supply. It too works fine, drawing about 6 mA.
 |
|
| Figure 5. | A higher battery voltage allows the use of MOSFETs in the current sinks, while a lower current in the reference arm of the bridge saves some supply current. |
It should be possible to feed the differential output through an instrumentation amp (with gain) to an ADC. Note the phrasing, which means I have neither tried nor even considered that approach in detail. This device was developed for lab use, not a process-control environment.
For a true, full-DIY version, around 100 Ω-worth of (very) fine copper wire should make a good sensor, if you have some patience. Copper’s TCR is close to that of doped platinum (Cu: 3.93 ppt/K; Pt: 3.85) so only alterations to R7/8 (to match the actual resistance) and slight re-trimming of R3 (for the copper’s TCR) would be needed. The 100-Ω RTD figure is common but not mandatory. For higher sensor resistances, use lower drive currents (giving less self-heating), adjusting R5 (and perhaps R6/7/8) to suit.
Perhaps the coil from that junk-boxed analog meter may yet come in handy?
