Yan-Niu Ren, Southwest Petroleum University, Chengdu, China
A constant current is better than a constant voltage for driving LEDs. In this proposed circuit, a common constant-voltage regulator is changed into a constant-current source for LEDs. In addition, a startup current limiter is used to suppress large current surges, and a voltage chopper is employed for a wide AC input of 96 to 260 VRMS.
 |
|
| Figure 1. | This circuit drives a string of LEDs with a constant current over the entire worldwide range of AC-mains voltages. The resistor in series with the LED string provides a convenient point to measure LED current via its voltage drop. |
The concept presented here originates from two Design Ideas published in 2011 (references 1 and 2) and was developed to improve power efficiency at a low cost. The circuits shown in Figures 1 and 2 both have the same brilliance of an inductorless chopper and the same controversial issue of power efficiency. To improve the power efficiency, you should observe two principles: The resistors of the chopper should dissipate as little power as possible, and the chopper should switch at the appropriate threshold voltage, VTH. In addition, VTH should be as close as possible to the operating voltage across the LED string. This approach minimizes the power dissipation of the constant-current regulator (CCR) while maintaining a constant LED current.
 |
|
| Figure 2. | The chopper operation is similar to the circuit of Figure 1; the larger LED series resistor, instead of a constant-current source, provides the current-limit function. |
The circuit shown in Figure 3 is an example that follows the principles described above, with a power efficiency of about 85%. Voltage regulator IC1 and R5 form a 20-mA CCR. The LED string has a sufficient number of LEDs to require 120 V at 20 mA. The voltage across R6 provides a means for indirect measurement of the LED current.
 |
|
| Figure 3. | This circuit achieves an efficiency improvement by using tight control of the switching threshold to provide just barely enough LED voltage. |
VTH is the diode bridge full-wave rectified output voltage above which, when divided by R1 to R3, the 68 V bias of D5 is overcome, turning on Q1 and turning off Q2. C1 charges quickly to VTH while Q2 is on, then discharges slowly into the LED string until the next half-cycle of the incoming AC.
VTH must be no less than required to maintain the LED operation voltage of 120 V at the end of C1’s discharge and no more than 1.414 times the VRMS of the lowest AC level. With 120 V required for the LEDs, plus the 3 V input-to-output differential required by IC1, plus 1.25 V developed across R5, the minimum C1 voltage will be 124.25 V. For simplicity, this figure can be rounded up to 125 V.
 |
|
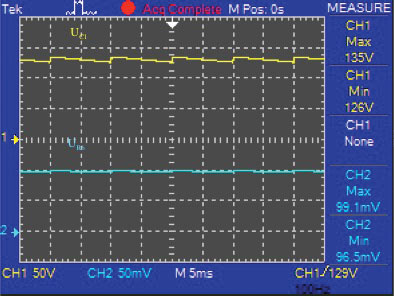
| Figure 4. | The yellow and blue traces, respectively, present the voltage across C1 and R6 in the circuit at 220 VRMS (at 50 Hz AC). The two traces remain at the same position when the AC input changes from 96 VRMS to 260 VRMS. |
As shown in Figure 4, the C1 discharge time is much longer than the charge time during a 50-Hz half-cycle of 10 msec. During this period, the peak-to-peak voltage across C1 is almost

Thus,
UC1_MAX = 125 V + 9.09 V = 134.09 V.
For simplicity, this result can be rounded up to 135 V. This is VTH; any voltage above this turns Q1 on and gets chopped off by Q2.
When Q1 switches on, the power consumption of R4 in Figure 3 is less than 20 mW at 260 VRMS input, and the R1-R2-R3-D5 divider dissipates less than 100 mW. This result is almost negligible compared with the 2.4 W consumed by the LEDs. These resistors are large value so as to consume as little power as possible. R3 allows fine adjustment of VTH to match the actual drop across the LED string.
A startup current limiter has been included to limit the large inrush current surge through C1 and Q2 that would occur if the AC were switched on at a time in its cycle just before VTH was reached. A current-limiting resistor would reduce efficiency on every cycle, but R9 limits only the surge to 1.35 A at power-up until C2 charges sufficiently to turn on Q3.
As the AC input increases, the power consumption of the chopper rises a little and power efficiency decreases somewhat, as shown in Table 1.
| Table 1. | Power efficiency of improved circuit | ||||||||||||
|
|||||||||||||
This improved circuit can run at 96 V to 260 V AC (at 50 Hz). For a larger LED current, increasing the capacity of C1 and decreasing the resistance of R5 are suggested. For a different LED operation voltage, some parameters should be recomputed in the same way as in the foregoing analysis. The lower the LED operation voltage is, the lower the AC input voltage can be. This Design Idea can also apply to AC at 60 Hz.
Author’s notes:
- Use high-voltage through-hole resistors or series surface-mount resistors to achieve at least 400 V withstand. A fuse is suggested for safety against shorts.
- Safety warning for novice experimenters: Lethal voltages are present in this circuit; use caution when testing and operating it. If scoping, use an isolation transformer to float the circuit’s ac input from earth ground; do not float the oscilloscope chassis. The scope ground cannot be connected to the circuit without isolation.
- Do not push the button with AC voltage applied. For safe maintenance, keep pressing the button to discharge C1 through R10 until D8 goes out.
References
- Sheard, Steve, “Driver circuit lights architectural and interior LEDs,” EDN, Aug 11, 2011, pg 41.
- Babu, TA, “Offline supply drives LEDs,” EDN, April 21 2011, pg 58.
