Sensors such as strain gages, RTDs (resistance temperature detectors), and thermistors produce a resistance that’s proportional to force or temperature. If you measure a sensor’s resistance, you can calculate the physical parameter. Circuits such as resistance bridges can help you measure the unknown resistance.
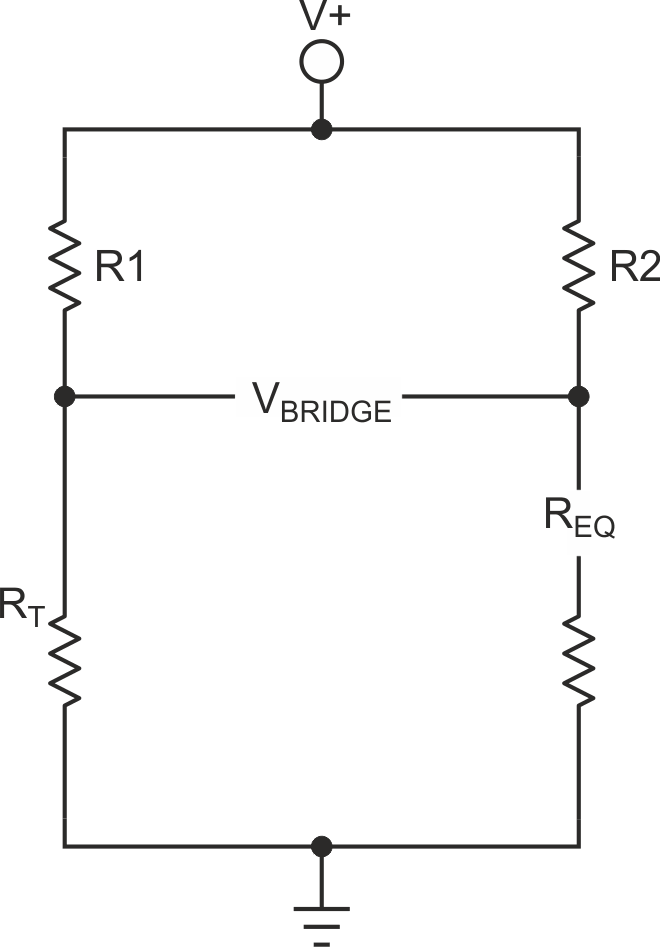
Figure 1 shows a typical bridge circuit where RT is the unknown resistance. By substituting a programmable amplifier for REQ, you can balance the bridge. Resistance REQ can force VBRIDGE to 0 V, from which you can calculate RT and convert its value to units of force or temperature.
 |
|
| Figure 1. | By measuring VBRIDGE and adjusting REQ, you can balance a bridge circuit and calculate RT. |
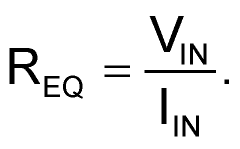
The circuit in Figure 2a is a programmable amplifier whose output voltage is proportional to the digital input code of the DAC (digital-to-analog converter). The DAC and amplifier A1 form a programmable inverting amplifier. The circuit actually functions as a divider because its gain, or transfer function, is less than 1. The difference between voltages VIN and VOUT forces a current through resistor R. You can use that value to calculate REQ in the bridge circuit. Figure 2b shows the equivalent circuit for the programmable amplifier.
 |
|
| Figure 2. | a) Programming the DAC’s output voltage changes REQ, which can balance a bridge circuit. b) Equivalent circuit. |
Using a microcontroller or a PC, you can adjust REQ by programming the DAC’s output voltage and then measuring the voltage across the bridge and adjusting REQ until the bridge comes into balance. Because A1 is an inverting amplifier, the circuit’s gain is

where the D terms represent the values of the DAC’s bits. If you use a 12-bit DAC, then N = 12.
To calculate REQ, you need to know the current in the circuit. If you assume that buffer amplifier A2 has infinite input impedance and zero bias current, then you can calculate IIN, which is

and

To test this circuit, simply connect a variable DC voltage source to VIN and measure the effective resistance with an ohmmeter. Table 1 shows the expected and actual resistance and the calculated error for the circuit with a 12-bit DAC.
| Table 1. | Output resistance vs. input code (R = 10 k, N = 12) | ||||||||||||||||||||||||||||||||||||||||||||||||||||||||||||||||||||||||||||||||
|
|||||||||||||||||||||||||||||||||||||||||||||||||||||||||||||||||||||||||||||||||
Figure 3 contains the schematic of a circuit that uses a comparator across the bridge. You can connect the comparator’s digital output to a microcontroller or PC that then can adjust the DAC’s output voltage. You can calculate REQ and then calculate RT, from which you can calculate strain or temperature based in the resistance curve of your sensor.
 |
|
| Figure 3. | This schematic of a circuit uses a comparator across the bridge. |
Using the circuit in Figure 1, you can generate digitally controlled resistor values with just one precision component, resistor R. If you need to increase the gain of the circuit, you can replace voltage-follower A2 with a noninverting amplifier configuration.